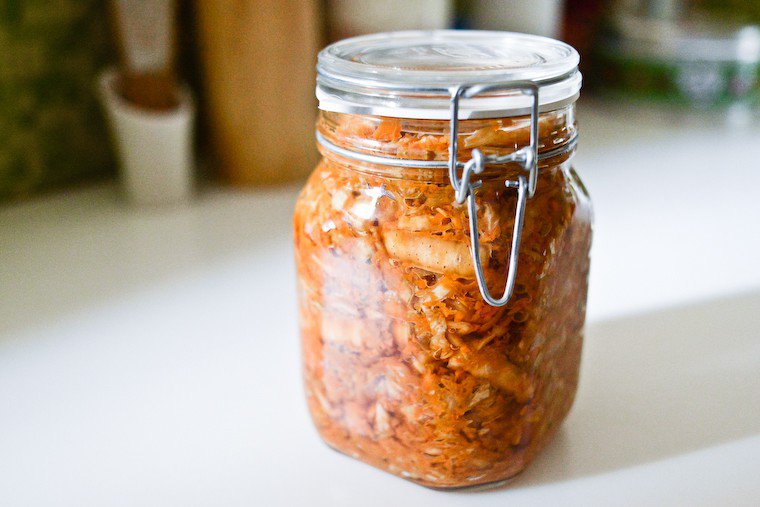
A few weeks ago in my newsletter (sign up now!) I hinted that I had prepared a really easy homemade kimchi, and I asked whether you wanted to hear about it. The response was an unequivocal “Yes!” so today I come to you with my DIY formula for kimchi.
I’ve long been intrigued by all things fermented. Whether it’s sourdough bread, pickles, yogurt, kvass, cheese, kombucha, milk or fruit kefir, preserved lemons… I find it inordinately exciting that microorganisms can be put to work like an army of tiny helpers to transform foods, improve their flavor, extend their shelf life, and boost their nutrition.
I can’t be babysitting microorganisms; I have real children, too.
I am also fascinated by the serendipity and ingeniosity of these preparations. How admirable were these early humans to discover and harness the fermentation process, long before we even knew there was such a thing as a microorganism?* (And how many died of food poisoning in the name of experimentation? Some kind of memorial is in order, surely.)
And because I’m just as interested in the microbiota and the beneficial effects of probiotic foods on gut health, I’m always seeking to expand my repertoire of DIY fermented projects that won’t turn my kitchen upside down, such as this easy homemade kimchi. (I can’t be babysitting microorganisms; I have real children, too.)
Make your own kimchi!
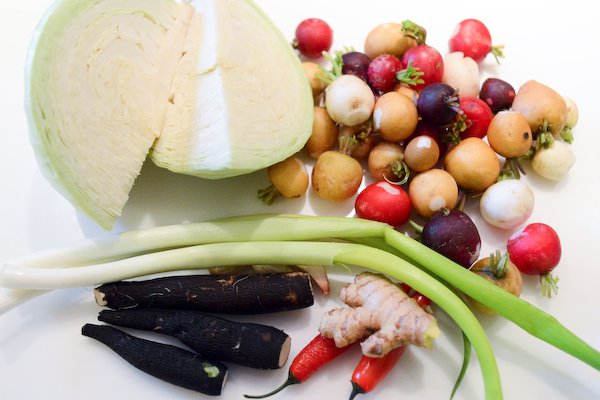
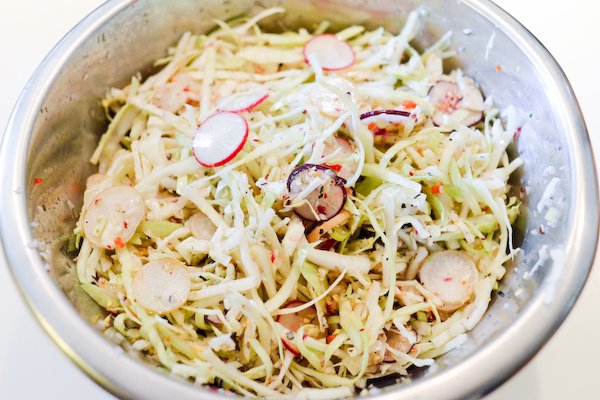
A preparation of spiced fermented vegetables, kimchi is a cornerstone of Korean cuisine: the average Korean puts away 250 grams** (9 ounces) a day. There are many different kinds, but the most iconic versions are based on napa cabbage, radishes, and/or cucumbers.
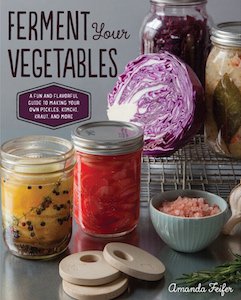
Curious to learn more about kimchi? Amanda Feifer’s wonderful book Ferment Your Vegetables has a whole chapter about it!
The process is incredibly straightforward: you select a mix of organic vegetables around the basic formula outlined below, adding pretty much any other vegetable you want to use up.
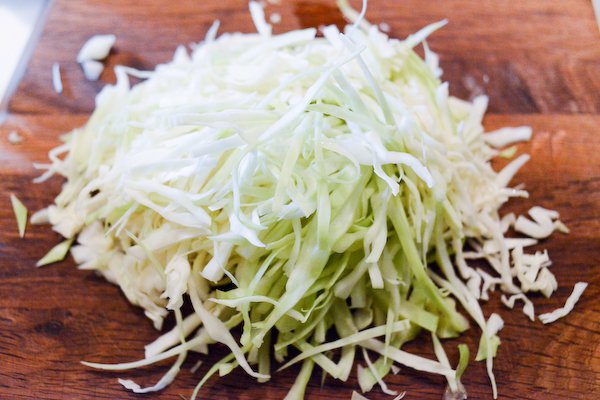
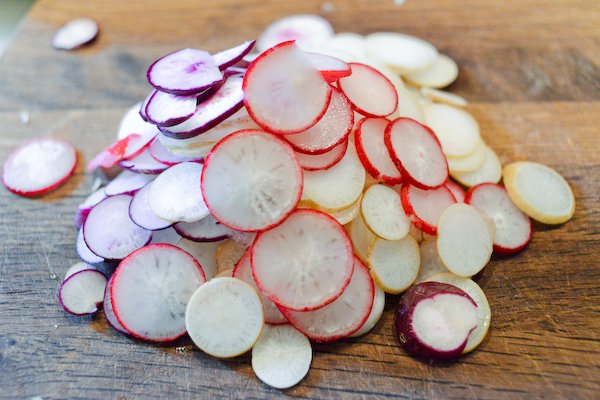
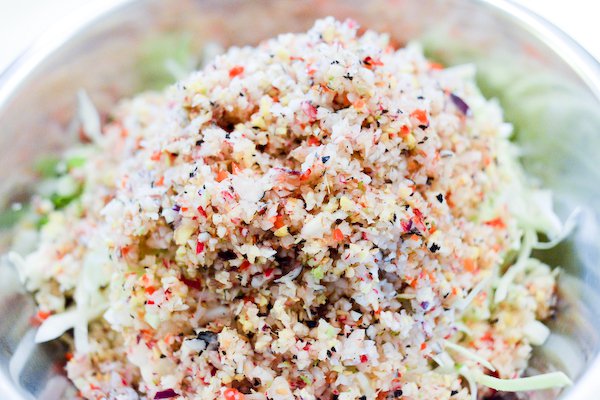
You chop or slice all this finely (by hand or with a food processor), add salt, and flavor with garlic, ginger, fish sauce (soy sauce for vegetarians), a bit of sugar, and some ground chili powder, making it more or less spicy depending on your preference.
This you’ll transfer to jars and allow to ferment on your counter for at least 5 days, ideally 3 weeks. You can then proudly pop one of the jars open, and dig into the deliciously full-flavored, tart and funky vegetable condiment you’ve created.
Favorite uses for this easy homemade kimchi
The first and most obvious use for this is with Korean food and Asian flavors in general. It would be a lovely item to have on hand if you were to make your own bibimbap (I especially like this recipe, made with the Inspiralizer), or maybe a batch of Korean pancakes, a sushi bowl, or any slurpy noodle dish (many more such ideas on my Asian Inspiration Board on Pinterest).
Beyond these, I like to plop kimchi onto grilled meats, or eat it with eggs (hard-boiled, scrambled, or sunny side up). I stir it into my fried rice and my vegetable stir-fries, I toss it into my salads and my bowls of roasted roots, and I slip it into avocado and/or cheese sandwiches***.
Homemade kimchi kicks thing up by a few notches, provides acidity and crunch, and an irreplaceable sense of pride that you’ve made this wondrous food yourself. And wouldn’t this make the most amazing edible gift for the food enthusiasts around you?
Fermentation transforms foods, improves their flavor, extends their shelf life, and boosts nutrition.
What about you?
Do you share my fascination for fermented foods? Have you ever tried kimchi, and how do you like to eat it? Ever wanted to make your own?
* It’s crazy to think this discovery didn’t happen until the late seventeenth century.
** Source: The excellent Ni Cru Ni Cuit, by Marie-Claire Frédéric, on the history and cultural significance of fermented foods.
*** Keep in mind that kimchi is fairly salty, so adjust the overall seasoning of your dish accordingly. Do not be tempted to reduce the salt content in the kimchi, however, as salt is what keeps the fermentation process safe.

Have you tried this? Share your pics on Instagram!
Please tag your pictures with #cnzrecipes. I'll share my favorites!
Ingredients
- 1/2 head napa or white cabbage (mandatory)
- 3 spring onions (mandatory)
- Radishes (daikon, pink, or black)
- Cucumbers
- Carrots
- Celery stalks
- 2-3 fresh chili peppers and/or 30 grams (1 ounce) Korean ground chili pepper (gochugaru)
- 3 cloves garlic, peeled
- 1 piece fresh ginger, about 25 grams (1 ounce)
- 20 grams (4 teaspoons) fine sea salt
- 60 ml (1/4 cup) fish sauce (preferably) or soy sauce (if vegan/vegetarian)
- 1 tablespoon sugar
Instructions
- Have ready a set of thoroughly clean glass jars with rubber seals amounting to 2 liters (2 quarts) total, such as two of these 1-liter French-made jars. For gifting, you could use these smaller, pretty ones with a colored lid (the recipe would fill 10).
- Brush your vegetables to remove any dirt, but don't scrub them too clean as we need the microorganisms living on their surface to initiate the fermentation.
- Trim the vegetables, and weigh them to keep 1.5 kg (3 1/3 pounds) total.
- Slice the cabbage into ribbons -- I do thin ribbons with a white cabbage, and slightly wider ones with napa cabbage as the leaves are more tender.
- If using pink radishes, you can opt to slice all of part of them finely with a mandolin slicer.
- Put the rest of the vegetables (radishes, carrots, celery stalks) with the fresh chili peppers if using, garlic, and ginger in a food processor or blender, and pulse until finely chopped.
- In a large mixing bowl, put the sliced and chopped vegetables with the salt, fish sauce, and sugar, and mix thoroughly.
- Allow to rest at room temperature for 2 to 6 hours; the vegetables will relax and release some of their juices.
- Divide among the prepared jars, tamping as you go to remove any air pocket. Leave about 2 to 3 cm (1 inch) of space at the top.
- Close the jars and place them on a tray or plate. (Within the first 2 to 3 days, as the fermentation begins, the jars will chirp and sigh, and may leak some juices. Wipe off any liquid without opening.)
- Allow to ferment at moderate room temperature without disturbing for at least 5 days, and up to 3 weeks. Once open, keep in the fridge and eat within a year.