When I was little, when my sister and I felt desultory and bored, my mother would sometimes make us a batch of salt dough for modelling. We would sit at the small folding table in the kitchen and squeeze and roll and pinch to our hearts’ content. And although my sister’s creations were invariably more delicate and life-like than my own, I remember I once proudly produced a full range of miniature fruits and vegetables that tasted shockingly salty when you applied your tongue on them (it was irresistible).
In retrospect, I am quite impressed by my mother’s ability to whip up a perfectly pliable pâte à sel in what felt like minutes, then bake our figurines in the oven without them burning or cracking, at a time when there was, naturally, no Internet to turn to for guidance*. I don’t remember there being a book of “fun stuff to keep the kids out of your hair” lying around either, so I chalk it up to motherly magic.
In any case, the memory of these childhood episodes was awakened when I first tried my hand at homemade pasta sometime last year, using a newly acquired pasta roller accessory for my stand mixer.
Pasta dough is the most pleasant dough the cook is ever given to handle, silky smooth and wonderfully cooperative, and letting it glide through the cylinders of the pasta roller and onto the palm of your flattened hand, to be folded and fondled and cut into any number of pasta shapes truly feels like child’s play.
The pasta dough recipe I use is based on the formula Michael Ruhlman shares in his Ratio book, a title you should definitely add to your wish list if it’s not already standing on your kitchen bookshelf. He gives a ratio of 2 parts egg to 3 parts flour for his pasta dough, and I’ve used it with good success. I like to substitute fine semolina flour for part of the flour, to give the pasta a little more substance and chew, and I add some salt as well, for a more even seasoning in the finished dish.
Although you can play around with this recipe and add flavoring or colorings to the dough — squid ink makes for a fetching presentation — I concur with Michael Ruhlman when he writes that “unlike flavored breads, which we eat with little adornment, pasta is usually dressed somehow, so you should have a good reason for flavoring your pasta dough, rather than adding the flavor after you’ve cooked it.”
I mentioned above that I invested in a (second-hand) stand mixer accessory to support my pasta-making ambitions, but a hand-cranked one works well too, though most people find it necessary to have someone land a third hand, at least when they’re starting out. Either one of these tools would make a generous gift idea for the culinary-oriented on your list.
What you can do without, however, is a drying rack: I’ve learned from my friends at Hidden Kitchen that wooden clothes hangers do the trick just as nicely — just remember to wipe off the flour before you put your black suit pants back on them.
* I imagine in the near future such a statement will elicit disbelief in young children, who will ask, “Really? There was no Internet when you were growing up?” and I will feel a million years old.
Homemade Pasta
– 3 large eggs, about 160 grams without the shells (5 2/3 ounces)
– 160 grams (5 2/3 ounces, about 1 1/3 cups) all-purpose flour, or the same weight as the eggs, plus more for dusting
– 80 grams (2 3/4 ounces, about 1/2 cup) fine semolina flour*, or half of the egg weight
– 3 grams (1/2 teaspoon) fine sea salt
Serves 4.
Break the eggs into a bowl set on a scale, weighing them to determine the appropriate amount of flour and semolina flour.
Place the flour, semolina and salt in a medium mixing bowl. Form a well in the middle, and pour in the eggs. Using a fork or a dough whisk, stir in the eggs, gradually blending them into the flour.
When the dough comes together, turn it out onto a lightly floured work surface, and knead it until soft and smooth — the traditional simile likens it to a baby’s bottom, minus the diaper rash I assume — about 8 minutes. The dough should not be tacky; add a little more flour if necessary. Cover it with a clean kitchen towel and let it rest for 30 minutes. (You can also prepare it up to a day in advance and refrigerate it.)
Divide the dough into 4 equal pieces. Take one piece of dough (keep the others covered to prevent them from drying out) and flatten it into an oval disk between the palms of your hands.
Have ready a couple of wooden clothes hangers, the horizontal bar wiped clean, dried, and lightly dusted with flour.
Set a pasta roller on the widest setting, and slip the disk of dough into the roller to thin it out. Fold the strip of dough in half so the two short sides meet, and slip the dough into the roller again, fold in first. Repeat 3 or 4 times until the dough feels supple and it is a more or less even rectangular shape. If it gets sticky at any point, dust it with a little flour.
Switch the pasta roller to the next (= narrower) setting and slip the dough in (just once this time) to thin it out. Repeat with the subsequent settings until you reach the thickness of your choice and get a long, rectangularish sheet of dough. Dust it with a little more flour, slip it onto the bar of one of the prepared hangers, and hang it to dry while you work on the remaining pieces of dough.
(If you don’t have a pasta roller, perhaps you can borrow one from a friend? Otherwise, roll up your sleeves, whip out your rolling pin, and roll the dough out as thinly as you can.)
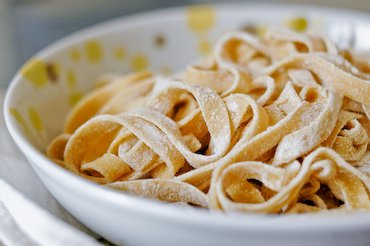
The pasta dough is now ready to be cut, either using the blades of the pasta roller to make fettuccine or spaghetti, or by hand to make ravioli or all sorts of hand-cut pasta shapes. You can also use the sheets of dough as is, to make lasagna or cannelloni.
To cook fresh pasta, plunge in boiling salted water. Stir gently during the first moments of cooking so they don’t stick to the bottom of the pan, then cook for a few minutes, until they rise to the surface. That’s your cue to taste for doneness, drain, and coat or top with the sauce of your choice.
Once cut and/or shaped, fresh pasta can also be frozen. Cook as described above, without thawing.
* If unavailable, just use 240 grams (8 1/2 ounces, about 2 cups) all-purpose flour.
Cooking/baking time: 5 min