A few weeks ago, my friend Estérelle and I attended a mochi cooking class held at La Cocotte, a lovely little cookbook shop in Paris.
Before we go any further, I think a semantics note is in order: strictly speaking, mochi is the name of a Japanese preparation of steamed glutinous rice that is pounded to form a sticky paste*. Mochi can be boiled, steamed, grilled, baked, or fried, and because it doesn’t have much inherent flavor, it is usually eaten with sweet or savory accompaniments. Although mochi is traditionally pounded from freshly cooked rice, modern home cooks are more likely to buy it ready-made at the store, or make it from rice flour.
I’m here to tell you that the glow and bounce of a freshly-made daifuku is plenty worth your trouble.
So that’s what mochi is, but it seems that many people outside of Japan use this term when they really mean daifuku mochi (or daifuku for short), which are soft mochi dumplings stuffed with a sweet filling, such as red bean paste (anko) or white bean paste (shiroan), served at room temperature and enjoyed as an afternoon treat (rather than a dessert).
I myself only recently learned the difference. When I first tasted (and took a shine to) daifuku in California years ago — we got them from our local Nijiya market — I thought of them as mochi, and kept calling them that until the afore-mentioned cooking class taught me otherwise.
Our teacher was Chihiro Tokioka, a Kyoto-born woman who now works as a cook and journalist in Paris. She first had us make dango, little balls of mochi skewered together and served warm, with a sauce or topping that can be sweet, savory, or both. We tasted ours with anko, with a sesame sauce, with a caramelized soy sauce, and with toasted soybean powder (kinako).
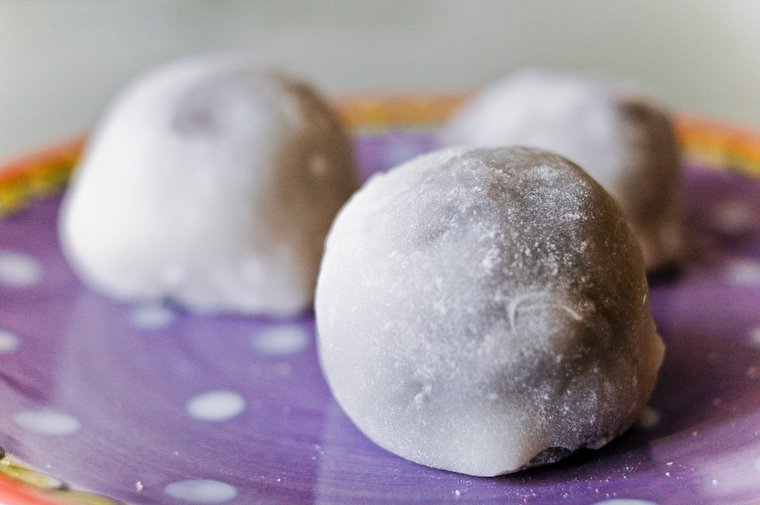
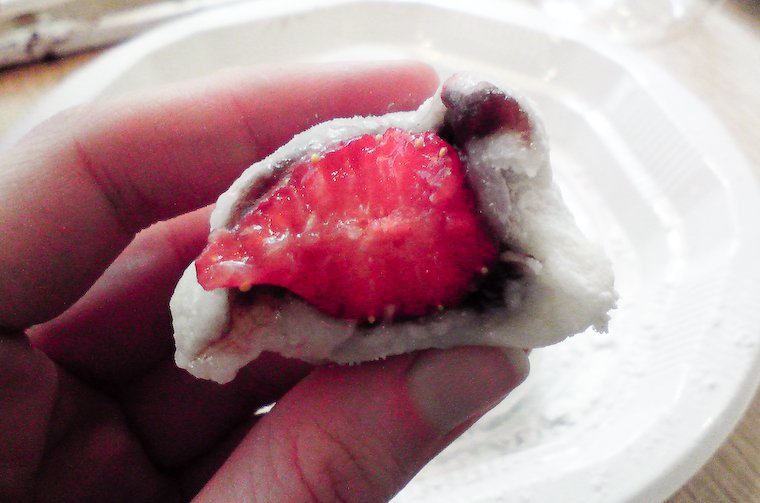
We then moved on to daifuku, of which we made two fruit-based kinds: some we filled with a chunk of kiwi wrapped in a layer of anko, others with a similarly anko-sheathed strawberry.
The latter kind, called ichigo daifuku in Japanese, was a revelation: I’d always had daifuku stuffed with a quite sweet, paste-like filling, and this variation took the concept to new heights: underneath the soft, powder-dusted exterior, the chewy-gooey layer of mochi, and the velvet of the anko, lay a juicy surprise that added freshness and a delicate floral flavor to the confection, making it easier on the sweet-o-meter, too.
At the first chance I got, I went out and bought the ingredients to repeat the experience in my own kitchen — whenever I take a cooking class, I try to make the recipes again shortly after, while the memory is still fresh — and on Saturday, I made my very first homemade batch of strawberry daifuku.
When I was researching all things mochi online, I read a few comments written by people who didn’t see the point of making their own daifuku when they could just buy them at the store. I obviously don’t know which store they go to, and how fresh those store-bought daifuku might be, but I’m here to tell you that the glow and bounce of a just-made daifuku is nothing if not worth the trouble.
I still need to work on my daifuku-shaping skills, but the process is a lot of fun and the outcome makes me and the other daifuku-lover in my household very happy, so I will be glad to practice. I might try to make the more classic anko-filled daifuku next time (I understand those can be made in larger batches and frozen, which isn’t true of the strawberry ones), and I may flavor/color the dough with green tea powder. I also read that chunks of mango work very well; any other stuffing suggestions to share?
* So sticky in fact that people die every year in Japan from choking on a mouthful of mochi too large to swallow.

Have you tried this? Share your pics on Instagram!
Please tag your pictures with #cnzrecipes. I'll share my favorites!
Ingredients
- 10 small strawberries, about 10 grams (1/3 ounce) each (if your strawberries are large, you can cut them in half)
- 100 to 120 grams (3 1/2 to 4 1/4 ounces) anko* (sweetened azuki bean paste: koshian is smooth, tsubuan is chunky)
- 100 grams (3 1/2 ounces) shiratamako* (glutinous rice flour; comes in granules)
- 50 grams (1/4 cup) sugar
- 150 ml (2/3 cup) cold water
- plenty of katakuriko (potato starch) for dusting (corn starch can be substituted) (see note)
Instructions
- Rinse, dry, and hull the strawberries. Coat each strawberry with about 2 teaspoons red bean paste. Place the coated strawberries on a plate and reserve in the fridge.
- Combine the rice flour, sugar, and water in a plastic or glass bowl, and stir to dissolve. Cook for 2 minutes in the microwave on medium, stir with a silicone spatula, and repeat once or twice, until the mixture is thick and slightly translucent.
- Combine the rice flour, sugar, and water in the bowl of the rice cooker, and stir to dissolve. Cook for 10 to 12 minutes, stiring once or twice during that time with a silicone spatula, until the mixture is thick and slightly translucent.
- Combine the rice flour, sugar, and water in a heatproof bowl that fits inside your steamer, and stir to dissolve. Place the bowl in the steamer and cover the bowl with a heatproof plate or cover. Close the steamer and cook for 10 to 12 minutes, stiring once or twice during that time with a silicone spatula, until the mixture is thick and slightly translucent.
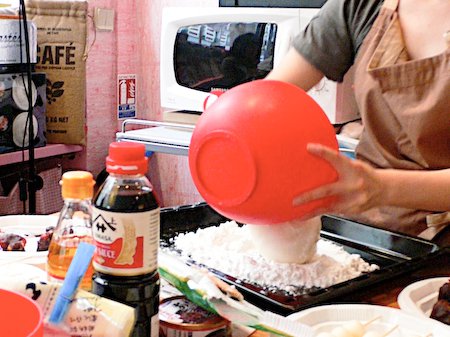
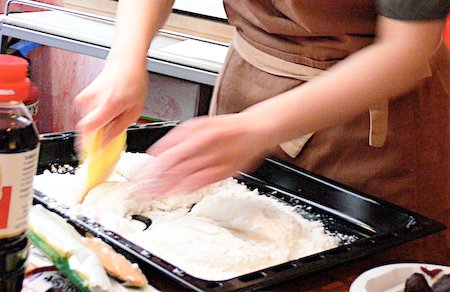
- While the rice flour mixture is cooking, pour a generous layer of potato starch in a rimmed baking sheet, and keep more potato starch on hand. When the rice flour mixture is ready, pour it onto the prepared baking sheet; it will be super sticky.
- Sprinkle generously with more potato starch and pat the dough to flatten it slightly (caution: it will still be super hot).
- Use a pastry cutter/scraper or a knife to cut it into 10 even pieces, square or triangular.
- Remove the coated strawberries from the fridge. Take one piece of dough, stretch it gently so it will be large enough to envelop a strawberry, and place it on the palm of your hand.
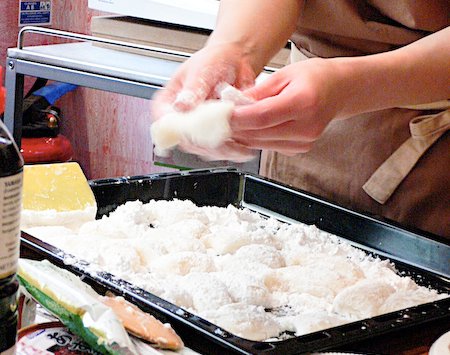
- Dust the starch off the top surface with a pastry brush, place a coated strawberry in the center, tip side down, and wrap the dough around it, twisting the edges gently to seal into a pouch, and making sure the dough doesn't tear.
- Place the daifuku seam side down on a plate dusted with potato starch, and repeat with the rest of the ingredients. The dough will get less flexible as it cools, so try to work at a brisk pace. Save the unused potato starch in a container to use again next time.
- Let rest for an hour to set and cool to room temperature before serving. Leftovers should be covered and stored at room temperature, but note that strawberry daifuku taste best on the day they're made, so don't make more than you plan to eat within a day or so.

Notes
- Look for anko, shiratamako and katakuriko in Japanese grocery stores.
- The recipe can be doubled, but these daifuku taste best on the day they're made, so don't make more than you can eat within a day or so.
- Take a look at this video for a demo.
- Prep photos kindly provided by Estérelle.