Petites brioches
Amongst the many good things a food blog will do to you, is this one: even when you feel you are completely ruining a recipe, your mind is already working on how to turn this potential disaster into what you hope will be an entertaining, tale-of-a-near-fiasco post for your readers — a much more constructive way to look at the situation than curling up on the kitchen tilefloor and weeping helpless tears of rage.
And this is what I was thinking yesterday, as the brioche dough I was working on chose to be exceptionally stubborn, sticking doggedly to my hands, and refusing to turn out even remotely like it should. I was on the brink of throwing the whole thing out several times — so close to the brink in fact that small rocks were already tumbling down. But thankfully Maxence was close by, and he encouraged me to persevere. Apparently, the prospect of freshly baked brioche will turn any boyfriend into a very persuasive baking coach.
So what happened, you ask? Why was this so difficult? The story of theses little brioches started when one of my cooking class buddies, Nicolas, offered to bring me a bit of fresh yeast from the bread-baking class he’s also taking. He showed up last Tuesday with a few tablespoons of the beige and faintly smelly gravel in a tiny ziploc bag, and said he would email me the brioche recipe that they used in class. He also instructed me to use the yeast within three to four days.
But life and work got in the way, and I didn’t get around to doing so until Sunday — five days after he had given me the yeast. Already I was feeling uncomfortable and apprehensive, not to mention a tad guilty for failing to use the gift in a timely fashion, but I brushed these doubts aside and got to work. The recipe Nicolas had given me was in fact a general set of guidelines, with just the list of ingredients and the rising times. Since I was a brioche virgin I needed a bit more detail. Not wanting to bug my friend, I searched for recipes on the web, dug up a slew of widely different versions, and settled on a helpful, step-by-step tutorial.
It instructed you to make a starter first, by combining the yeast with a bit of milk and flour. After a short rest, the starter would make little bubbles to tell you it was ready to take over the world. Alas, mine never did. Even though I set the bowl on top of our server where it’s nice and warm, the mixture remained despairingly quiet and inert. My heart sunk. Had I killed the yeast, or perhaps worse yet, let it die a small, dishonorable death in the refrigerator? (I later found out that I should have removed it from the fridge a few hours before, to bring it to room temperature — it would have worked better then.)
At that point, I found myself at a crossroads: I could either a) move forward with the fresh yeast, at the risk of having the dough never rise and bake into a hockey-puck brioche, or b) chicken out, and use the dried yeast I’d had on my baking supplies shelf for months and never used. And well, I, um, chickened out.
My next problem was that the different recipes I had found were very different from one another, both in terms of proportions and resting time. Not knowing which one was best, I decided to stick to the ingredients’ list Nicolas had provided. I don’t know what I did wrong, perhaps it was because I was doing this by hand and not in a stand-mixer, but once I added the eggs in, the dough was far, far too sticky to work with. And when I say sticky, I really mean superglued-to-your-hand sticky. In fact, I’m sure you could spread some of that dough on the soles of your shoes and glue yourself upside down to the ceiling, but don’t try this at home.
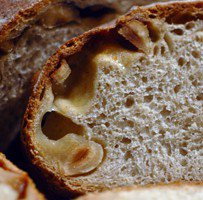
So I added more flour, until the dough was a bit more workable — the amount in the recipe below reflects what I ended up using. The addition of the butter turned out to be another hurdle: it was super messy, there was butter everywhere on the counter, and the dough seemed adamant not to let it in. But by that time I was in warrior mode, ready to overcome any obstacle: I persisted, and after a while I obtained the deliciously smooth and shiny ball of dough I was hoping for. It rose obediently, even though I couldn’t resist peeking underneath the kitchen towel every twenty minutes, and baked beautifully, turning into these puffy and golden little guys that somewhat reminded me of the flame that the Statue of Liberty holds so proudly.
So yes, the whole thing was a bit of a roller coaster ride, and it is definitely a project that will keep you busy for the better part of a day — especially when you get up late and it’s Daylight Saving Sunday. But nothing could be more worthy of your time than the thrill of having things turn out okay despite your foreboding, or more rewarding than a delicately sweet brioche, warm and lightly crusty from the oven, that you slice in two to smear the moist and fluffy insides with butter and/or jam. Especially if it’s Bordier‘s salted butter, and Christine Ferber‘s passionfruit jam, freshly opened for the occasion.
And now I feel ready to try it with fresh yeast — perhaps next Sunday?

Have you tried this? Share your pics on Instagram!
Please tag your pictures with #cnzrecipes. I'll share my favorites!
Ingredients
- 280 grams (10 ounces) all-purpose flour + a bit more for sprinkling
- 40 grams (3 tablespoons) granulated sugar
- 5 grams (1 teaspoon) salt
- 10 grams (1/3 ounce) fresh yeast or 1 1/2 teaspoons active dry yeast (I use the SAF brand), at room temperature
- 3 large eggs
- 120 grams (4 1/4 ounces) butter, diced, at room temperature + plus a pat to grease the molds
- 1 tablespoon milk
- 1/4 cup pearl sugar (available in Paris from G. Detou)
Instructions
- In a large mixing bowl, combine the flour, sugar, salt, and yeast. Form a well in the center. Break the eggs in a small bowl, and pour them into the center of the well. Stir in the center of the well with a fork, gradually mixing the flour into the eggs.
- Once all the flour is incorporated, transfer the dough onto a lightly floured surface, and knead it for 12 minutes, using the heel of your hand to push the dough down and away from you, before you fold it back onto itself (this is called fraiser in French, and I have no idea why). The dough will feel very sticky, but will get smoother and smoother as you knead -- don't despair.
- Spread the dough into a squarish shape, place the diced butter on it, and close the dough over the butter. Start kneading again until the butter is completely incorporated: at first it will feel like that will never ever happen considering the mess you're making, but be persistent -- if it ended up working for me, it should work for you. When you're done, the dough will be smooth and shiny and so delightfully pleasant to handle you could keep doing that all afternoon, but don't.
- Put the ball of dough into a floured mixing-bowl, sprinkle the top with a bit more flour, cover the bowl loosely with a kitchen towel, and let rise for 4 hours in a warm spot, or until the dough has doubled in volume.
- Grease a tray of 6 muffin molds with butter.
- Transfer the dough onto your work surface, punch it down, and divide it into 6 equal pieces. Roll them into balls, and plop into the muffin molds.
- Cover loosely with the kitchen towel, and let rise for 1 to 2 hours. To check if the dough is ready to bake, poke it gently with your finger: if it springs back right away, it needs more time; if it springs back slowly, it's ready.
- Preheat the oven to 200°C (400°F), with a small ramekin of water inside.
- Brush the brioches lightly with milk (not too much or it will burn) and sprinkle with thick grains of sugar.
- Put the tray of muffin molds into the oven to bake for 15 to 20 minutes, until puffy and golden and beautiful. Transfer onto a rack. Eat while they're still warm, or let cool to room temperature.