Last spring, we had a few friends over for dinner who were visiting from the US. One of them works for the excellent magazine The Art of Eating, and kindly thought to bring us the latest issue*.
It would have been a lovely hostess gift under any circumstances, but as I sat down to read it the next day, I was jump-on-the-couch ecstatic to discover that it contained no fewer than fourteen pages (fourteen! pages!) on the subject of pain au levain (a.k.a. sourdough bread), which has been my number-one kitchen obsession for the past year and a half — probably the longest-standing ever, too. (See my initial post on natural starter bread and ensuing starter-based recipes.)
This fourteen-page (fourteen! pages!) article is written by James MacGuire, an esteemed American chef and baker who, as I learned from the contributors’ section, acted as the technical editor in the English translation of Raymond Calvel’s fundamental boulangerie book The Taste of Bread.
Following a discussion on the history and technique of pain au levain, MacGuire shares a recipe I eagerly tried a few days later. It was such a success it has become our go-to bread, and I’ve baked a weekly loaf of it ever since.
The perfect process for pain au levain
The originality of the process is that it requires no kneading (but not that kind of no-kneading). Instead, the dough is simply folded over itself as it ferments in the mixing bowl, a few times every hour over a period of four hours. This develops the gluten and the flavor, yielding a wonderfully tasty loaf with minimal effort.
To be clear, it’s not that I mind the kneading, especially since I generally just use my stand mixer, but it is a noisy animal, and this method allows me to get a loaf started in the blissful silence of weekend mornings, without awaking the entire household. (And yes, I realize I could also knead the dough by hand, but I’ve never really gotten into the zen of kneading high-hydration doughs. I just get annoyed by the goo.)
Another departure from my previous routine is that MacGuire recommends keeping a 66%-hydration starter, i.e. a starter that’s fed 2 parts water and 3 parts flour (in weight) at every feeding, as opposed to the half-and-half rule I’d been following up until now. I’ve made the transition without any problem and frankly my starter seems no less or more active than it was before, but I’m sticking to it out of habit now.
How I make pain au levain
I make the recipe with French T80 flour (farine bise, a partially whole wheat flour), which is the type of flour MacGuire would use while baking in France, and often mix it with some T110 as well (farine intégrale, for which a little more of the grain husk is kept) for a greyer crumb. Because the recipe is written with American bakers in mind, MacGuire suggests emulating T80 or T110 flour by using some all-purpose flour and some whole wheat flour, which you’ll sift first to remove part of the bran it contains.
I’ve scaled down the recipe — almost halving it — to make the amount of bread we’ll eat within eight days or so, and I’ve rounded the gram amounts after the scaling, to make the recipe easier to memorize (though I admit I keep a cheat sheet on the fridge).
The overall timeline has you prepare the starter in two successive builds the day before baking (one in the afternoon, one before bed), then prepare the dough in the morning and bake it in the afternoon. This works out smoothly for those who work from home, naturally, but if you don’t, you can perhaps fit this into your weekend schedule, building the starter on Saturday and baking the bread on Sunday. I’ve indicated specific times for clarity, but you can shift the whole process according to your needs.
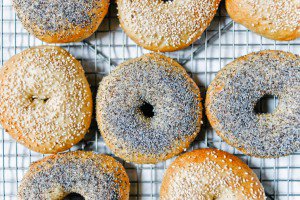
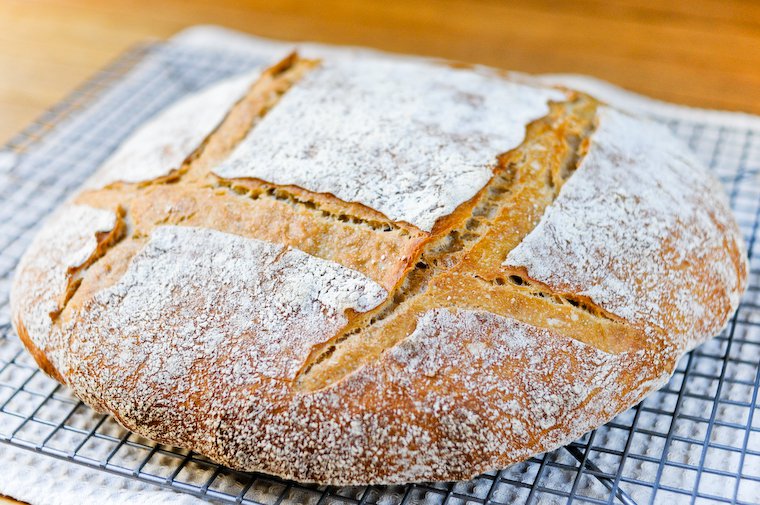
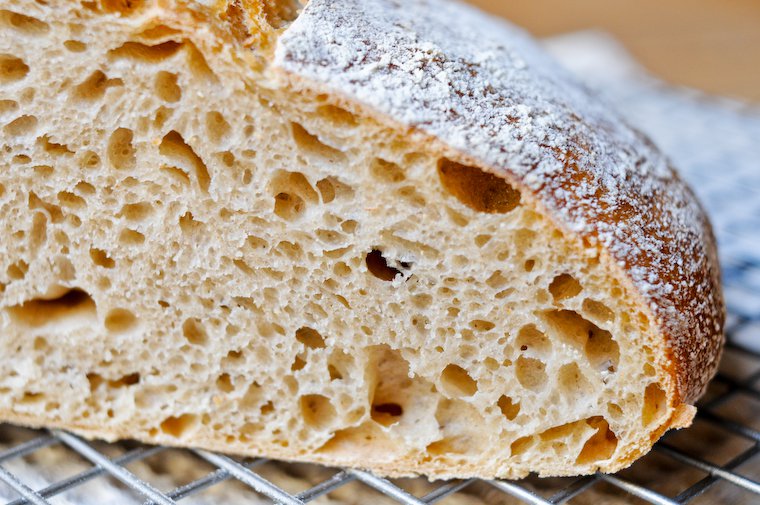
I still feel I have room for improvement in my understanding and use of this recipe: the oven spring is not always consistent (I got less than usual when I took the photo above) and I’d like to try and get a thicker crust, but the flavor is excellent and the crumb well aerated, so I’m already very pleased with it.
I admit I am not very diligent about the temperature at which I keep my starter and proofing dough (nevertheless I’ve indicated MacGuire’s recommendation below), nor about the temperature of the water I use in the dough, and those are factors I plan to work on.
I would like to note again that there is a lot more to the article that this recipe (did I mention the number of pages it spans?) and you’ll get more insight into the recipe by reading about it in MacGuire’s words, so I encourage you to get a copy of the magazine if you can. (And you don’t need me telling you that this sort of independent, subscriber-funded, ad-free publication needs the support of people like you.)
* Issue #83 can be back-ordered on the Art of Eating website.
Update: After receiving the following note from Edward Behr, editor and publisher of the Art of Eating, I am reposting the recipe below.
James MacGuire, author of the pain au levain article and recipe, and I, who published it in The Art of Eating, a print magazine without advertising, have asked Clotilde to please, with our blessing, repost her version of James’s pain au levain recipe. I apologize to anyone who was offended by my concerns, expressed to Clotilde only in a private email. When I saw that so much of his effort had been borrowed, albeit adapted, I merely wrote her to say that “I’d be grateful if you were able to retreat from giving away quite so much of James’s and our work.” I was perhaps oversensitive, because our articles are sometimes taken verbatim and posted online in their entirety, including photos, without permission. I was trying to protect both the magazine and the writer. Many people may not realize that a careful piece of writing, such as James’s, has undergone two dozen or more drafts and represents lengthy back and forth with editors and copy editors. (Current online publishing exists almost entirely without copy editors.) The pain au levain article, including the recipe, represents 25 years of James’s learning and experience, and, just for this piece, two research trips to France. He hopes this and other writing from AoE will have a second life as the basis of a bread book, and too much circulation of this work online will discourage a publisher from taking on such a book. Even as print appears to be dying, online publishing relies almost entirely on information paid for by traditional media, mainly print. The issues of how high-quality information is to be paid for, as it must be in some way, in a digital age are complicated, far too much to address in a short space, and no one really understands what will take place. Certainly, I have no special knowledge. In any case, I once again apologize for offending any reader of this blog.

Have you tried this? Share your pics on Instagram!
Please tag your pictures with #cnzrecipes. I'll share my favorites!
Ingredients
- 20 grams (0.8 ounce) 66%-hydration starter (see note)
- 20 grams (0.7 ounce) water
- 30 grams (1 ounce) all-purpose flour
- 70 grams (2.5 ounces) starter from the refresher build
- 55 grams (2 ounces) water
- 85 grams (3 ounces) all-purpose flour
- 360 grams (12.5 ounces) T80 or all-purpose flour
- 210 grams (7.5 ounces) starter from the levain build
- 12 grams (0.4 ounces) salt
- 410 grams (14.5 ounces) water
- 230 grams (8 ounces) T80 or T110 or sifted whole-wheat flour (see post for an explanation of the sifting)
Instructions
- Place the 20 grams starter in a bowl. Add the 20 grams water and stir with a wooden spoon until diluted. Add the 30 grams flour and stir until thoroughly combined. Cover and set aside at warm room temperature; optimal temperature is 24.5-26.5°C (76-78°F).
- Eight hours later: add the 55 grams water to the bowl, and stir until diluted. Add the 85 grams flour and stir until thoroughly combined. Cover and set aside at warm room temperature.
- Eight hours later: in a large mixing bowl, place the 360 grams flour, the starter from the bowl, the salt, and the water. Using a dough whisk or your hand (James MacGuire recommends "using both stirring and grasping movements" then), stir the ingredients until you get a smooth batter with no lumps.
- Add the remaining flour and stir it in until entirely absorbed. The dough will be rough. Cover and let stand for 5 minutes.
- Using a flexible dough scraper, fold the dough over itself 8 to 10 times in the bowl, as demonstrated in this video. (If you don't have a suitable scraper, you can use your hand to grab, pull and fold the dough -- this is actually what James MacGuire instructs.) This folding replaces the kneading. Cover and let stand for another 5 minutes.
- Fold the dough again 8 to 10 times. (It should be about 8:30am now.) Cover and let stand 1 hour.
- After 1 hour, fold the dough again 8 to 10 times.
- After 2 hours, fold the dough again 5 to 6 times.
- After 3 hours, fold the dough again 5 to 6 times.
- After 4 hours, fold the dough again 5 to 6 times. Notice that the combined folds form a sort of knot at the top of the dough.
- Have ready a round basket or salad bowl, about 25 cm (10") in diameter. Line it with a clean kitchen towel (not terry cloth) and dust it with flour, lightly but evenly.
- Using the scraper to loosen the dough from the bowl, turn the dough out onto a lightly floured work surface (I use an old silicon baking mat) so that the "knot" faces down. Flip the dough again into the prepared basket so that the "knot" faces up again. Work gently to avoid deflating the dough.
- Cover and let stand for 1 1/2 to 3 hours, until the dough is well risen. To test whether the dough is ready to bake, poke it gently with your finger to make a 1-cm (1/2") indentation: if it springs right back, it needs more proofing. If it springs back within 2-3 seconds, it's ready. If it doesn't spring back at all, it's overproofed and should be baked asap; it won't rise in the oven as much as it could have, but you'll live.
- At least 30 minutes before the rise is complete -- that's hard to tell of course, but over time you'll develop a sense of how long your dough needs to rise -- place a baking stone in the lower part of your oven and preheat it to 230°C (450°F).
- Five minutes before the rise is complete, place a rimmed baking sheet in the lowest rack of the oven, underneath the pizza stone. Bring about 240 ml (1 cup) water to the boil in the kettle.
- When the rise is complete, lightly dust a pizza peel with flour. Turn the dough out onto the peel as you would a crème caramel (MacGuire's simile, not mine); work gently to avoid deflating.
- Using a baker's blade or a sharp knife, score the top of the loaf with shallow marks in a tic-tac-toe pattern, or the pattern of your choice. The scores should not be too deep -- just about 5 mm (1/8").
- Insert the loaf in the oven and onto the preheated stone, working quickly and closing the oven door again as soon as you can to avoid losing too much heat.
- Reopen the oven door as briefly as possible to pour the boiling water into the rimmed baking sheet: wear long sleeves and an oven mitt, and use a vessel with a pouring spout, such as a measuring jug, so as not to burn yourself. Close the oven door right away.
- After 25 minutes, rotate the loaf by a half-turn to ensure even baking. Lower the heat to 175°C (350°F).
- The loaf should be done after 50 minutes of baking; you can leave it in a little longer if you prefer a darker crust.
- Transfer to a rack and let rest for at least 4, and preferably 6 hours or overnight, before slicing.
Notes
- Adapted from James MacGuire's recipe as published in issue #83 of the Art of Eating magazine.
- The ounce conversions have been slightly rounded for ease of use; I go by the metric measurements in my own kitchen.
- A 66%-hydration starter is fed 2 parts water and 3 parts flour (in weight) at each feeding. If you maintain a 100%-hydration starter (fed equal weights water and flour), use 24 grams of your starter and only 16 grams water for the refresher build, then proceed as written.