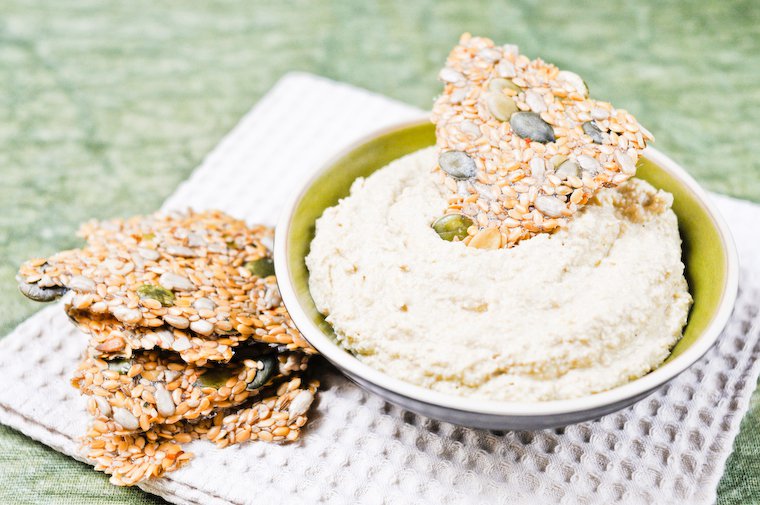
Raw Flaxseed Crackers

Have you ever tried soaking flaxseeds? If not, know that something eerie transpires as soon as your back is turned: while the seeds swell and absorb the water, they release a gel-like substance (called mucilage) so that next time you look, your bowl is filled with a kind of jiggly aspic in which the seeds are suspended.

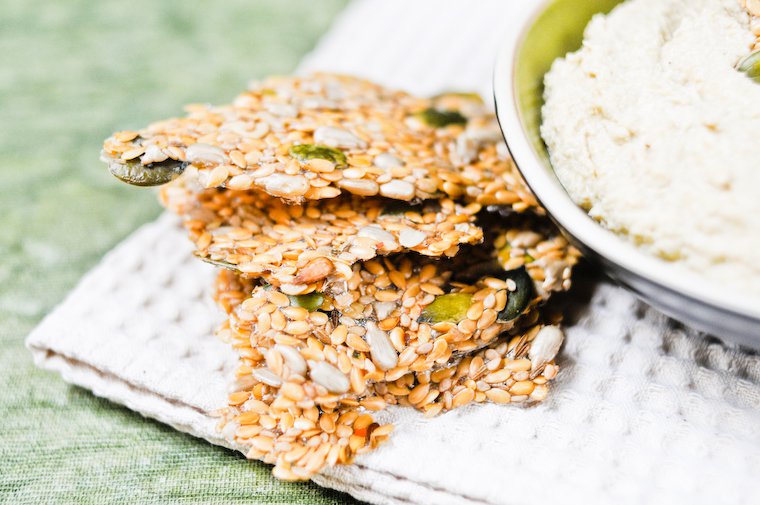
This little trick makes flaxseeds (also called linseeds, or graines de lin in French) particularly popular with raw food practitioners, because that very goop acts as an efficient binding agent in all manner of uncooked preparations*, such as these raw flaxseed crackers.

And since I have temporary custody of a spiffy dehydrator, as you may remember from my raw buckwheat granola post, I’ve been using it to make regular batches of raw flaxseed crackers.

The simple idea is this: you soak flaxseeds so they’ll ooze out their mucilage, then combine them with other seeds, soaked** and drained, and the seasonings of your choice. This mixture is spread on a dehydrator tray and left to dry for a few hours, until you get — tadaa! — uncooked crackers, crisp and nutty, ready to be snacked upon alone or with your favorite dip.

The most delicious raw flaxseed crackers

I have played around with spices and flavorings, and I think I like smoked paprika (not raw, I imagine, but very good) or cumin best. But naturally, you could dream up a fennel seed or ras-el-hanout version, mix in a crushed garlic clove (just beware that the crackers will give off a very garlicky smell while they are dehydrating) or some fresh herbs, use soy sauce in place of the salt… whatever floats your cracker boat.

And if you don’t have a dehydrator, you can spread the mixture on parchment paper and use your oven at a very low setting (preferably around 45°C/110°F) or even, I am told, the energy of the sun, if the weather complies: it would take a few days, certainly, but you’d have yourself some pretty cool sun-dried crackers.

Flax Seed Crackers and Hummus

Flax Seed Crackers and Hummus

* And I can’t not mention that some people use flaxseeds to make their own hair gel! Apparently it works wonders on very curly hair, not that I would know anything about that.

** The purpose of soaking grains, nuts and seeds is explained here.

Continue reading »

Tomato Burger Buns

Good cheeseburgers aren’t hard to come by in Paris these days (my favorite comes from Burger and Fries, an In ‘N Out copycat), but I greatly enjoy the ones we make ourselves for lunch on weekends, with homemade buns, organic ground beef from the Batignolles greenmarket, and slivers of comté cheese lounging on top.

Having gleefully discovered that I could buy portobello mushrooms at said greenmarket — although we have plenty of the brown mushrooms we call champignons de Paris, the overgrown version is rarer than a Vélib’ with tight brakes — I have added portobello cheeseburgers into the rotation, and would be hard-pressed to decide which version I like best.

To make my latest batch more exciting, I made tomato burger buns, simply adding tomato purée to the dough.

All of this starts with a good bun naturally: one that’s soft enough to be bitten into without a struggle, but not so soft it breaks down under the combined effect of the seeping juices and the girdle of your thumbs.

My ideal burger bun

Supermarket buns are a total turnoff for me — I incriminate the ingredients’ list as much as the styrofoamy buns themselves — and since the French like to say on n’est jamais aussi bien servi que par soi-même (a Type-A aphorism that means nothing’s ever done as well as when you do it yourself), I just take matters into my own hands.

After a few errant trials over the years, I found my ideal bun in a NYT article last summer, for which baker Hidefumi Kubota had shared the light brioche bun recipe he’d created for L.A. restaurant Comme Ça.

I made it as written and liked it a lot, but soon altered the recipe to incorporate some of my sourdough starter for extra flavor — here’s my conversion method by the way. I do still use some commercial yeast, because enriched doughs need more leavening oomph than the starter alone can provide in a reasonable amount of time. (Trust me: I recently tried a starter-only version that turned out so dense I nearly broke a toe when I dropped one bun on my bare foot.)

Making tomato burger buns

And to make my latest batch more exciting, I made tomato burger buns. The inspiration came from a tweet by my friend Chika about a slice of tomato bread, which she wrote about in more detail a few days later.

Chika explained to me that the lady who had made that tomato loaf had simply substituted tomato purée for the milk in her recipe: a marvelous idea that could be winningly applied to these burger buns, I thought.

I used an organic, no-salt-added, slightly chunky tomato purée from Italy which I buy in jars for next to nothing at the most unglamorous supermarket ever, but if you have garden tomatoes you could certainly make your own. What you need here is simply ripe tomato flesh, mashed or chopped, but otherwise unprocessed and unseasoned.

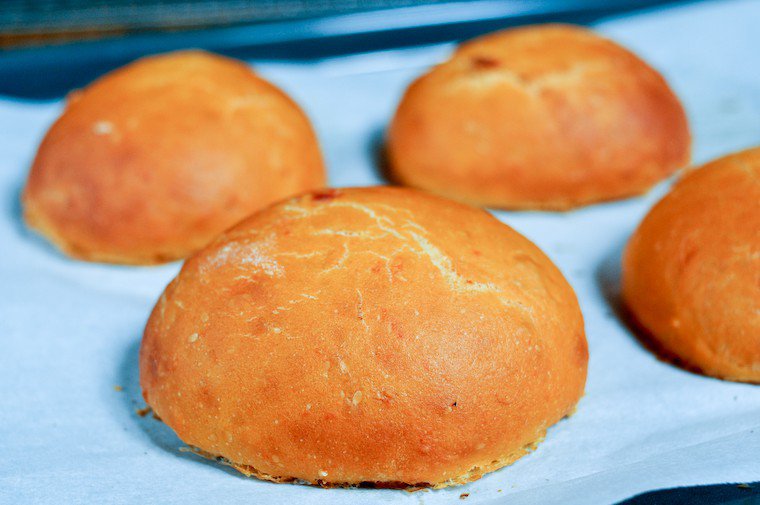
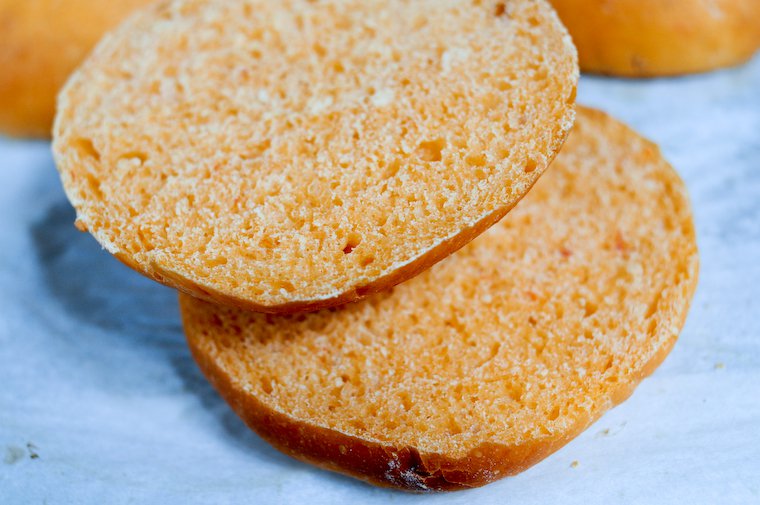
My tomato burger buns are as light-textured as their plain counterparts, but have a much more arresting look, sunset orange with red highlights.

My tomato burger buns are as light-textured as their plain counterparts, but have a much more arresting look, sunset orange with red highlights. The tomato flavor is faint, especially when it has to measure up with the boldness of the other burger elements, but it does add zing to the bun. And anyway, the point is, that warm color changes everything, right?

So before you turn your back on summer altogether, I suggest a batch of these, so you can treat yourself to a few transitional burgers, indoor or out. And already I am wondering what other breads I shall tomato-ize. Bagels, maybe?

Tomato Burger Buns

Continue reading »

Raw Buckwheat Granola

Two years ago, I met a young British woman named Poppy — that alone made my day — who introduced herself as a raw chocolatier.

I had a taste of her heart-shaped raw chocolates, assembled from raw Arriba cacao and a bunch of raw superfoods, and liked them so much I devoted one of my ELLE à table columns to them.

And when we met one day for her to demonstrate her chocolate-making prowess, she gave me a bag of her raw buckwheat granola, which was one of the items she served during the raw brunches she then hosted at Bob’s Juice Bar in Paris.

I can’t picture myself “going raw”, but I do admire the necessity-is-the-mother-of-invention effect of such dietary limitations, and I love learning about, and tasting, the entirely new dishes they spur.

If you’ve been scratching your head over the high incidence of the adjective raw in the above paragraphs, I’ll quickly explain: raw foodists, or proponents of “living foods”, consider that the nutritional benefits of plant-based ingredients are essentially lost when they are heated beyond a certain temperature — the exact threshold varies depending on whom you ask, but it’s around 40-46°C (100-115°F). So their (often vegan) diet focuses on unprocessed raw fruits, vegetables, nuts, and seeds, as well as sprouted seeds, grains and legumes.

As I’ve mentioned before, I’m immensely curious about this kind of rebellious diet. I couldn’t picture myself “going raw” — I like bread and comté cheese too much — but I do admire the necessity-is-the-mother-of-invention effect of such dietary limitations, and I love learning about, and tasting, the entirely new dishes they spur.

Especially when they’re as fantastic as Poppy’s raw granola. When I asked how she made it, I was a little deflated to learn it required a food dehydrator, which my arsenal didn’t include, and certainly regretful that I had munched down the bag so fast.

Fast-forward two years, and I find myself with a food dehydrator on loan for a month. What was my first impulse? Yes, exactly.

I emailed Poppy again to get details, and although she didn’t have an exact recipe to share, she was able to explain the straightforward process: soak* some buckwheat groats, soak some almonds and/or nuts and seeds of your choice, combine with honey, spices, and salt, and dehydrate.

I followed Poppy’s directions for the most part, filling in the blanks when it came to the actual amounts of each ingredient, and adding a little coconut oil because I felt like it. I have also read that you can sprout the buckwheat in addition to soaking — as demonstrated in these videos — and I may try it next time, but I’m here to tell you it works splendidly without that extra step.

It is really quite amazing how the somewhat slimy mixture — buckwheat groats become viscous little things when soaked — transforms itself in such crunchy, nutty clusters. The buckwheat flavor is subtle, which I like, and blends beautifully with the nuts, honey and spices to form a delicate alliance.

Because I prefer bread for breakfast, I’ve been eating my raw buckwheat granola as an afternoon snack, with fresh fruit and homemade kefir.

I think I may like it even better than regular baked granola, of which I am terribly fond, and although I’m still hesitant to acquire a dehydrator of my own, this recipe alone might be all the convincing I need.

* The purpose of soaking grains, nuts and seeds is explained here.

Continue reading »

Pain au Levain (Sourdough Bread)

Last spring, we had a few friends over for dinner who were visiting from the US. One of them works for the excellent magazine The Art of Eating, and kindly thought to bring us the latest issue*.

It would have been a lovely hostess gift under any circumstances, but as I sat down to read it the next day, I was jump-on-the-couch ecstatic to discover that it contained no fewer than fourteen pages (fourteen! pages!) on the subject of pain au levain (a.k.a. sourdough bread), which has been my number-one kitchen obsession for the past year and a half — probably the longest-standing ever, too. (See my initial post on natural starter bread and ensuing starter-based recipes.)

This fourteen-page (fourteen! pages!) article is written by James MacGuire, an esteemed American chef and baker who, as I learned from the contributors’ section, acted as the technical editor in the English translation of Raymond Calvel’s fundamental boulangerie book The Taste of Bread.

Following a discussion on the history and technique of pain au levain, MacGuire shares a recipe I eagerly tried a few days later. It was such a success it has become our go-to bread, and I’ve baked a weekly loaf of it ever since.

The perfect process for pain au levain

The originality of the process is that it requires no kneading (but not that kind of no-kneading). Instead, the dough is simply folded over itself as it ferments in the mixing bowl, a few times every hour over a period of four hours. This develops the gluten and the flavor, yielding a wonderfully tasty loaf with minimal effort.

To be clear, it’s not that I mind the kneading, especially since I generally just use my stand mixer, but it is a noisy animal, and this method allows me to get a loaf started in the blissful silence of weekend mornings, without awaking the entire household. (And yes, I realize I could also knead the dough by hand, but I’ve never really gotten into the zen of kneading high-hydration doughs. I just get annoyed by the goo.)

Another departure from my previous routine is that MacGuire recommends keeping a 66%-hydration starter, i.e. a starter that’s fed 2 parts water and 3 parts flour (in weight) at every feeding, as opposed to the half-and-half rule I’d been following up until now. I’ve made the transition without any problem and frankly my starter seems no less or more active than it was before, but I’m sticking to it out of habit now.

How I make pain au levain

I make the recipe with French T80 flour (farine bise, a partially whole wheat flour), which is the type of flour MacGuire would use while baking in France, and often mix it with some T110 as well (farine intégrale, for which a little more of the grain husk is kept) for a greyer crumb. Because the recipe is written with American bakers in mind, MacGuire suggests emulating T80 or T110 flour by using some all-purpose flour and some whole wheat flour, which you’ll sift first to remove part of the bran it contains.

I’ve scaled down the recipe — almost halving it — to make the amount of bread we’ll eat within eight days or so, and I’ve rounded the gram amounts after the scaling, to make the recipe easier to memorize (though I admit I keep a cheat sheet on the fridge).

The overall timeline has you prepare the starter in two successive builds the day before baking (one in the afternoon, one before bed), then prepare the dough in the morning and bake it in the afternoon. This works out smoothly for those who work from home, naturally, but if you don’t, you can perhaps fit this into your weekend schedule, building the starter on Saturday and baking the bread on Sunday. I’ve indicated specific times for clarity, but you can shift the whole process according to your needs.

I still feel I have room for improvement in my understanding and use of this recipe: the oven spring is not always consistent (I got less than usual when I took the photo above) and I’d like to try and get a thicker crust, but the flavor is excellent and the crumb well aerated, so I’m already very pleased with it.

I admit I am not very diligent about the temperature at which I keep my starter and proofing dough (nevertheless I’ve indicated MacGuire’s recommendation below), nor about the temperature of the water I use in the dough, and those are factors I plan to work on.

I would like to note again that there is a lot more to the article that this recipe (did I mention the number of pages it spans?) and you’ll get more insight into the recipe by reading about it in MacGuire’s words, so I encourage you to get a copy of the magazine if you can. (And you don’t need me telling you that this sort of independent, subscriber-funded, ad-free publication needs the support of people like you.)

* Issue #83 can be back-ordered on the Art of Eating website.

Pain au Levain: Crumb

Continue reading »

Roasted Patty Pan Squash and Herbed Chickpeas

The patty pan squash (in French: le pâtisson) is a member of the blended summer squash family. Shaped very much like a UFO with undulating edges — each bump a tiny cockpit with an alien inside, presumably –, it can be conical or squat, and comes in shades of yellow, green, or white. The flesh inside is the color of clotted cream, its heart studded with edible seeds like the center of a zucchini.

Like all summer squash, the patty pan squash is best eaten when young and small. I prefer patty pans that are no larger than the palm of my hand, with a buttery and subtly sweet taste and faint artichoke notes.

Patty Pan Squashes

If you do find such specimens — at the farmers market or perhaps in your CSA share –, make sure you use them soon after bringing them home: in my experience, they don’t keep as well as your average zucchini, and their skin mottles after a couple of days.

(If you’re only able to find bigger ones, I recommend you make this wonderful patty pan squash soup with pesto.)

Small patty pan squashes don’t need to be peeled: they can just be cut into slices or sections, and steamed, sautéed, braised, grilled, or roasted. It is also traditional to stuff them, which I’m sure is lovely, but also a tad more involved than I’m ready for these days.

Making roasted patty pan squash

What I like to make with the patty pan squashes that cross my path is this warm-to-cold salad, a summer counterpart to one of my favorite winter salads: patty pan squash segments roasted till golden, al dente chickpeas, and a slick dressing of herbs and anchovies whizzed together with lemon peel and olive oil. I like to eat it on its own for a light yet filling lunch, but it can also be served as a side to roast chicken or grilled fish.

Any patty pan inspiration of your own to share?

Continue reading »

Get the newsletter

Receive FREE email updates with all the latest recipes, plus exclusive inspiration and Paris tips. You can also choose to be notified when a new post is published.

View the latest edition of the newsletter.