Tips & Tricks

Minimalist Kit for the Traveling Cook

I am going to be traveling these next few weeks, doing some simple cooking in a couple of rented kitchens, and I’ve had enough hair-pulling experiences with crappy, dull knives and flimsy plastic spatulas to be stashing a few key utensils in my luggage this time.

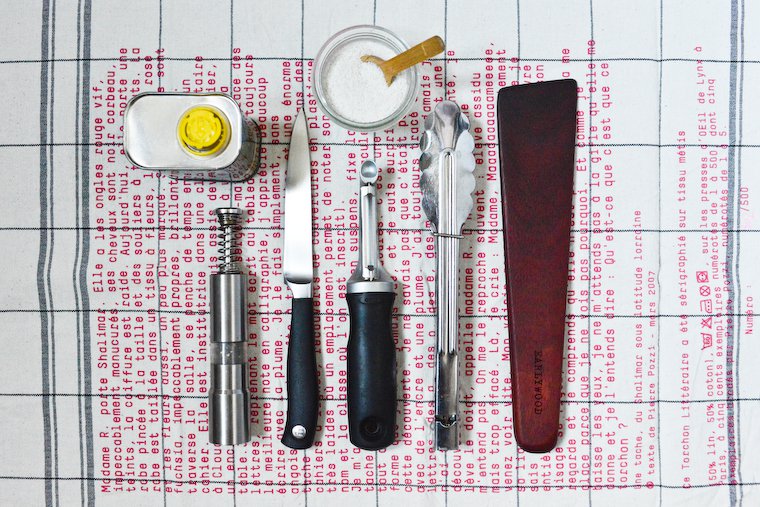
Because I am also traveling with a toddler and a baby who need their own minimalist traveling kit — including such essentials as toy diggers, special blankets, and stuffed monkeys — I really need to make my kit as trim as possible, and have elected to bring along:

~ My paring knife, freshly sharpened: rented kitchens are notoriously lacking in this regard, and since half of cooking is cutting, trimming, slicing, dicing, chopping, and paring, this qualifies as an absolute must-bring. I will be following this tip on how to wrap knives for traveling.

~ My vegetable peeler because, again, anything that’s supposed to be sharp is going to be dull in a rented house, and a dull vegetable peeler is worse than no vegetable peeler at all. Also, a good vegetable peeler allows you to cut vegetables into tagliatelle and papardelle to make all kinds of pretty summer salads such as this zucchini noodle salad.

~ A pair of locking tongs because it’s rare (especially in France) to find it in a home cook’s utensil drawer, yet I rely on it heavily for handling ingredients, for stovetop cooking, and for grilling. As a bonus, it doubles up as a toy for the toddler, who uses it to catch imaginary fish.

~ My Earlywood scraper made of bloodwood, sturdy and smooth with a thin and sharp edge, and a fantastic multipurpose tool that can be used for stirring, cutting, lifting, and scraping. I have written about Brad Bernhart’s handcrafted utensils before, and they’ve become cherished items in my kitchen that get used every single day (including his latest creation, the adorable coffee scoop, which I use daily to serve my paleo granola).

Continue reading »

How To Cut and Peel Hard Winter Squash

Sweet Dumpling Squash and Pattypan Squash.

Winter squashes, with their wonderful range of shapes, colors, patterns and flavors, are definitely among the sweeter treats of the cold months. But the sweetness comes at a price: first, you have to roll up your sleeves and find some way to cut and peel the lovely beasts without losing a finger to the process.

Indeed, while some — especially in the early season — boast a thin rind easily peeled with a vegetable peeler, or even one that’s edible (cue love letter to the Hokkaido squash, potimarron in French), most secure their tender flesh underneath a tough outer shell that challenges even the sharpest chef’s knife. The task is made trickier by the shape of the squash, which is rarely stable enough that you can hack at it safely. And even if you do manage to cut your way through, working your paring knife along the grooves and ridges of the rind can be awkward and time-consuming.

Ever wondered how to cut and peel hard winter squash?

Fortunately, there is an easier way, which I’ve recently adopted: it consists in par-cooking the squash for a very short time in a pan of simmering water to just soften the rind: after this treatment, only the very outside of the squash is cooked, which means you remain free to do with it as you please, whether you want to boil it, roast it, braise it, or stir-fry it (take your pick).

Here’s how to proceed:

Continue reading »

Five Baking Lessons from Huckleberry’s Zoe Nathan

Fresh Blueberry Brioche (photography by Matt Armendariz)

Huckleberry is a bakery and café in Santa Monica that is run by baker Zoe Nathan and her husband Josh Loeb. Although I’ve never had a chance to visit myself, I understand it’s a wildly popular place that has successfully disproven the nay-sayers who told Zoe Nathan that, “nobody eats bread and pastries anymore,” least of all in LA.

Earlier in the fall Zoe Nathan released her first book, published by Chronicle Books and also called Huckleberry, and after hearing her on the Good Food podcast I was very curious to see it.

It did not disappoint: it is a gorgeous book, with a sunny polka-dotted pattern printed on the edges of the pages that makes you want to place it backwards on your bookshelf, and Matt Armendariz’s delectable photography. Although the book was co-written by Zoe Nathan, her husband, and their long-time associate Laurel Almerinda, they have chosen Zoe Nathan’s voice to guide the reader through the book, in a day in the life format that starts at 3:30am (oy!) with “Muffins” and ends at 10am with “Coffee and other beverages”.

Nathan’s is an opinionated voice, too, one that does not mince words — considering the tone of Gabrielle Hamilton’s new Prune cookbook, could this be a trend? — and is pretty honest about the hard work and emotional roller coaster involved in running a successful bakery.

I’ve particularly enjoyed the general baking advice that she shares at the front of the book, and thought I’d share the five baking lessons that have stuck with me the most.

1. Color is flavor

Most bakers, myself included, are so afraid of burning things they usually take their baked goods out of the oven before they have reached the apex of their flavor.

It’s perfectly understandable — who wants charred cake? — but the fact is, a tart crust is much crispier and tastier if it is allowed get to the brown side of golden; a crumble or cobbler (Nathan’s example) needs plenty of time for the fruit to completely collapse and soften; a naturally leavened baguette or sourdough loaf expresses its full complexity when it is darker than we think.

Zoe Nathan says we should “treat [color] as another ingredient to be measured” and encourages us to “flirt with disaster” and push the baking time just a little more than completely comfortable. And in truth, there is often a lot more time than we think between underbaked, just right, and overbaked.

Black and Blue Oat Bars (photography by Matt Armendariz)

Black and Blue Oat Bars (photography by Matt Armendariz)

Continue reading »

How To Open a Walnut Without a Nutcracker

I learned how to open a walnut with this cool trick this summer: Maxence and I took a little more time off than we usually do, and the three and a half weeks (three! and a half! weeks!) we afforded ourselves allowed us to embark on a mini-Tour de France to visit with friends and family: from Franche-Comté to the Vosges in the East of the country, then all sails South toward the Périgord, the Pyrenees, Toulouse, and finally Provence.

We ate like kings, as can be expected, and our luggage got heavier and heavier at every stop as we loaded up with various local treats.

The Périgord walnut wasn’t the least of them: about halfway through our trip, we happened upon La Maison de la noix, a shop entirely devoted to the brainy nut. In addition to all the walnut spreads and jams and terrines and cakes one could dream of, I loved that they sold four varieties of walnuts that you could sample — using their cool low-tech nutcracker — and compare.

“Oh, but you can just use any old knife,” she said, and proceeded to show me how, with a deft twist of the blade and very little force, she could tame the toughest walnut.

Most people think of the walnut as being a single thing — a walnut is a walnut is a walnut — but examining and tasting just these four side by side showed how wrong that is, as each displayed a different size and shape, and a different flavor profile, too. The one we liked best was the Lara, a jumbo walnut with a sweet, delicate flavor and very little bitterness. We filled up a big bag and went on our merry way, excited to share them with our friends at the mountain house we were renting together on the Ariège side of the Pyrenees.

But, as you might remember from my minimalist cooking kit, a nutcracker wasn’t part of my traveling arsenal, and the house kitchen — which was otherwise much better endowed than I’d feared — didn’t have one either.

When I shared my dismay with my friend Marie-Laure, she replied, “Oh, but you can just use any old knife!” and proceeded to show me how, with a deft twist of the blade and very little force, she could tame the toughest walnut.

Slip the tip of a knife at the seam

Continue reading »

Meal Planning Tips and Tricks

I never dreamed I would one day become a meal planner.

For years and years, planning meals sounded achingly dull to me, and also pointless: I just kept a well-stocked pantry and fridge, and spontaneity was my middle name. In truth, I did formulate a plan for the fresh stuff I bought, but it was a fluid, unwritten one that was often altered or nixed when something came up, or I changed my mind, or I was short on time, or we felt like eating out.

And then, I had a kid.

I stuck to the same non-system for months, until I eventually realized it was no longer working for me. Rather than enjoying the delicious freedom of improvised cooking, as I had since my early twenties, I was feeling stressed trying to find time for meal preparation between work and child, and worst of all frustrated that I always seemed to be in a rush, cooking basic things that required no forethought and gave me no sense of accomplishment.

My cook’s soul was shriveling up, and meal planning was the obvious solution. A few months later, I am a much happier and more serene cook. I don’t plan our meals in writing every week — sometimes the mental plan is enough for me to wing it — but doing so regularly enough has helped me regain a sense of peace and control in the kitchen.

FREE PRINTABLE: You can download the meal planner I use to work out our weekly menus!

Meal Planning Tips: How I Do It

First of all, I only plan for meals I take with Maxence — my lunches are either simply assembled at home or eaten out — and in my household, breakfasts, desserts, and snacks can be trusted to happen satisfyingly without the need for planning.

I draw up my meal plan on Mondays, after I uncover the contents of my weekly vegetable delivery, and I also take into account:

  • A quick inventory of pantry or freezer items that I feel like (or need) using, plus leftover ingredients or dishes from the previous week (say, a container of homemade stock, some pesto, a few scraps of dough…),
  • The current list of things I’m inspired to cook,
  • A rough schedule for the upcoming week, to know when we’ll be eating in or out or having guests over, on which nights I’ll have time to cook, etc.

I give it a think, look through my recipe collections online and offline, do some research as needed for extra information or inspiration, and come up with:

  • A list of dishes and the days on which I plan to cook them, factoring in leftovers nights and wildcard meals (see below), and outlining what part(s) of those menus should work for our two-year-old,
  • A list of advance prep steps that can or should be done the day before (cleaning vegetables, soaking chickpeas, mixing the dough for a pizza or quiche crust, taking an item out of the freezer to thaw…),
  • A shopping list of missing ingredients, with the days I’ll be needing them so I know when to go to which shop.

This gives me a clear picture of what I need to do and when, so I can squeeze prep steps wherever they most readily fit in my schedule.

Read on for more on the 9 benefits and 7 “Yes, buts” of meal planning.

Continue reading »

Get the newsletter

Receive FREE email updates with all the latest recipes, plus exclusive inspiration and Paris tips. You can also choose to be notified when a new post is published.

View the latest edition of the newsletter.