Tips & Tricks

6 Tips to Make the Most of Your Cookbook Collection

Notice how English titles are printed in reverse direction from French titles. It's good for stretching your neck when browsing.

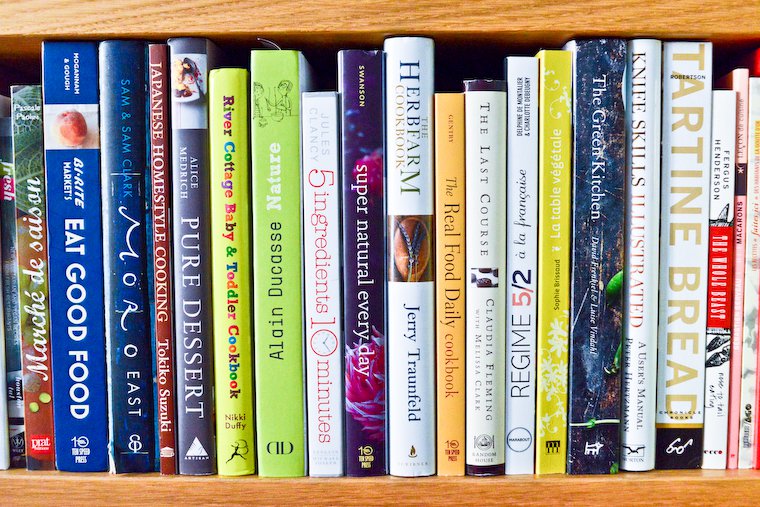
I’m sure your cookbook shelves are groaning as heavily as mine, and if I were to ask you how often you cook from them you might look away, embarrassed, and try to change the subject. Especially if your spouse, who regularly comments on the extent of your collection, is within earshot.

It’s not that you don’t want to cook from all these books; you do. It’s just that it’s impossible to remember what’s in them. And however well built their indexes (or indices), it would be pretty cumbersome to open every single one of them to look up, say, “Brussels sprouts” when you come home from the greenmarket on a chilly but sunny Saturday morning.

6 Easy tips to make the most of your cookbooks

It does seem a shame to let so much knowledge and inspiration go untapped, and here are six ways to avoid that:

  1. Sticky-tab appealing recipes, and regularly leaf through your collection to refresh your memory.
  2. In each of your cookbooks, list all the recipes you want to try, with page number, on an index card. Place that custom-made index in the front of the book for quick reference. (This also serves as a good decision tool to see whether you should really keep that book.)
  3. Take photos of (or scan) the recipes you want to try, and keep the image files, grouped together by book or dish type as you prefer, in a dedicated folder on your computer. (I use the application Tiny Scanner on my phone, and generate a separate pdf for each book.)
  4. Keep a top 10 list of dishes you want to try right here right now, referencing the cookbook(s) they come from. You could maintain a list without setting any kind of limit, but in my experience, the list grows too long and stops being useful.
  5. Pick a different cookbook every month or so, and challenge yourself to cook X number of recipes from it (make X realistic) before moving on to the next.
  6. Sign up for Eat Your Books, a cookbook recipe database that lists over 125,000 cookbooks, plus food magazines and blogs (you’ll find an index of C&Z recipes in particular). EYB allows you to replicate your cookbook collection online, so you can run searches for recipes, bookmark the ones you want to try, or have already cooked and enjoyed. It’s a brilliant service, and I’m only sorry it doesn’t cover the French half of my cookbook collection.

Join the conversation!

Tell me how you make the most of your cookbook collection: what’s your system? Do you even have a system? If not, what’s your greatest challenge?

Disclosure: The founder of Eat Your Books, Jane Kelly, converted my trial membership to a complimentary lifetime membership back when I first joined in 2010. When this post first appeared, it was a membership giveaway that I had arranged at my initiative. All opinions expressed are my own.

This post was first published in March 2014 and updated in January 2016.

How To Transport Your Knives

When I went out and got my knives sharpened recently, I had to solve the question of how to transport them safely, and my intuitive idea was to roll them up in a kitchen towel.

When the guy at the shop handed them back to me to take home a week later, I was pleased to hear him say that this was the best method. I also noticed his fold was a lot neater than mine, so I thought I would share it with you.

Learning how to transport your knives

Naturally, if you’re a traveling cook who has to carry knives around frequently*, it might make sense to buy a special carrying case such as this knife roll, but if you’re only transporting them a few times a year to cook at a friend’s house or to get your blades sharpened, you can definitely save the money and use a simple kitchen towel.

The trick, as you’ll see in the animation below, is to pick one of your thicker kitchen towels, and to fold it so that the tips of the blades push against a double layer of fabric, so they won’t just slice through.

Continue reading »

How To Open A Pomegranate (In 4 Easy Steps)

When I was in San Francisco a few weeks ago, I met up with my long-time friend and fellow blogger Elise, who very kindly showed up with homemade chocolate biscotti, and a few pieces of fruit from her garden.

Among them was a pomegranate, and I had to pick my jaw up from the floor. To a Parisian kid, pomegranates (grenades in French) are super exotic, the kind of fruit that must grow in some faraway tropical forest with multicolored birds and monkeys flying around, the kind of fruit that should also (once the kid is all grown up and environmentally conscious) be eaten in moderation because of the carbon footprint.

Pomegranate juice is a gorgeous ruby pink color, yes, but do you want it polka-dotting your clothes?

Yet I adore pomegranates. I love biting into their little seeds bursting with tart juice, and I love sprinkling them on stewed vegetables and on salads, especially the raw kale salad with avocado and cilantro that I made a few times in San Francisco.

Showing you how to open a pomegranate

So I received this local pomegranate with great joy, and as I was about to cut it open and harvest the seeds — standing at Heidi‘s beautiful marble counter — I thought I’d take a few quick pictures to share the technique with you in case you’re new to this whole pomegranate opening thing.

(I have only just heard about this wooden-spoon whacking technique, and will have to try that next time, though I have yet to be convinced it saves that much time. Also: the violence of it!)

0. Before you begin, put on an apron and roll up your sleeves; pomegranate juice is a gorgeous ruby pink color, yes, but do you want it polka-dotting your clothes?

Pomegranate

1. Using a sharp knife, cut a slice off the top and the bottom of the fruit, just to uncover the seeds. Make four vertical cuts all around the fruit, cutting through the rind just until you reach the seeds but not slicing into them.

Continue reading »

Why Does Food Stick To My Knife? (And How To Make It Stop.)

The food! It sticks to my knife!

One of the reasons why I love to cook is one I have in common with people who knit: it is involving enough to keep your mind off world peace issues, but leaves enough mental space that you can wander, hold imaginary conversations, turn sentences around in your mind (everyone does that, right?), and generally putter about in the coziness of your own head.

Prepping vegetables launches me into such inner monologues, and in recent months they have been dominated by this nagging question: why does food stick to my knife, and how do I make it stop?

You know the phenomenon, I’m sure, but let me describe it for you: whenever I slice something (say, an onion or a zucchini), the pieces I’ve just cut tend to stick to the right side of the blade (I’m right-handed), so that when I’m cutting the next slice, the pieces that are stuck on there get pushed up and off by the new slice, and fall either to the right of my blade (unruly, but fine), or tumble off the cutting board and possibly onto the floor (messy), or fall to the left side of my blade, in which case I’m likely to cut into them again moments later (extra annoying).

After composing an imaginary email in my head over a few zucchini-slicing sessions (I eat a lot of zucchini), I finally sat down and wrote to Peter Hertzmann, the spectacularly knowledgeable creator of the à la carte website and associated blog, cooking instructor, and author of the must-own Knife Skills Illustrated, of which he kindly offered me a copy when we met in San Francisco a few years ago (more details about the book)*. And naturally Peter had answers, which I’m sharing below, mixed in with a few more tips I gathered in my research.

So, why does food stick to my knife?

The main reason is surface tension, a physical phenomenon that makes the surface of liquids resist an external force. In this case, it means that foods with a high water content (and many vegetables are more than 90% water) create slices with a moist surface that clings to the flat of the blade.

And how do I make it stop?

You could decide to subsist on low-water foods — I’m sure a diet of beef jerky and rice crackers will do you a world of good — or you could adopt one or more of these three strategies:

Continue reading »

How To Roast Hazelnuts and Remove Hazelnut Skin

Few nuts are as notably improved by roasting as the hazelnut.

Most raw hazelnuts you find at the store are, in truth, a little chewy and a little bland, like a draft version of themselves. But a healthy roasting fixes that, boosting the flavor and allowing the excess water to evaporate, thereby leaving you with wonderfully crisp nuggets of pure nuttiness.

The bonus advantage when you roast hazelnuts is that it gives you the opportunity to skin them while you’re at it, rubbing them in a kitchen towel as the bitter husk easily detaches into a million little flakes you do not want to accidentally spill on your kitchen floor, trust me.

How to roast hazelnuts, and what to do with them?

I confess that most of the hazelnuts I roast and skin in this fashion, I end up snacking on with dried fruit such as prunes, figs, pears, or dates, as mentioned in this post about food gifts. But I also love to eat them on Roasted Cauliflower à la Mary Celeste, use them for a Hazelnut and Nectarine Gratin, or grind them to make Dukkah, this fantastic spice mix from Egypt. (More hazelnut recipes?)

Join the conversation!

Do you usually roast and skin the nuts you cook and bake with? And what’s your favorite way to enjoy hazelnuts?

Continue reading »

Get the newsletter

Receive FREE email updates with all the latest recipes, plus exclusive inspiration and Paris tips. You can also choose to be notified when a new post is published.

View the latest edition of the newsletter.