Spinach is one of the rare vegetables I will not eat. Possibly, this has to do with the green puke they were trying to pass off as spinach at summer camp. I did try real supposedly yummy fresh spinach, but could not take it. Bleh. The only form I can eat it in, is when it doesn’t taste like spinach at all, in spinach ravioli for instance.
Now, people tell me swiss chard tastes very much like spinach, so my taste buds must be a bit weird, as I seem to love swiss chard about as much as I loathe its cousin. I had been craving swiss chard pie all summer, so last week-end, when I saw big bunches of it at the produce store, I got one. It was so huge I had to cut it in two so it would fit in the fridge. But that was very easily done with my new extra-sharp chef knife. Heh.
As much as I am particular about home-made pie dough for desserts, I always use store-bought flaky (pâte feuilletée) or regular dough (pâte brisée) for the savory pies and tarts I make. Grocery stores in France carry perfectly acceptable ones. This time I had gotten thin pizza dough (less fat apparently), to see how it would turn out.
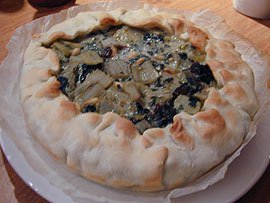
Premade pie dough is sold rolled out onto parchment paper then rolled up into a cylinder, making it easy as pie (haha) to just unroll it onto your pie dish, saving you the laying out of parchment paper in the bargain. But as I unrolled this pizza dough, I realized it was really very small in diameter. I needed it to be quite larger than my dish to have extra dough to fold over the filling, so I tried to massage it to the desired size by pulling at the edges with my hands. But I must not have done this gently enough (or just bad karma?), because the dough ripped and was just a mess. I thought what-the-heck-I’ll-just-start-over, turned it into a ball and tried to roll it out using a rolling pin. When that obviously didn’t work – the dough being way too elastic – I just dumped it in the trash (I should have saved it and used it for something else but didn’t, as a measure of punishment), ran to the store, luckily just a block away, got another one, skipped the line thanks to a nice customer who saw I only had one item, and hurried home. This time I handled the dough with way more care, and laid it out in a deep pie pan, with “flaps” of dough hanging outside.
I then prepared the swiss chard. I washed it, then separated the leaves from the stems. In a large pot, I heated up olive oil and two cloves of crushed garlic – very flavorful pink garlic from Lautrec (our friend Ludo – a cooking enthusiast as well – brought us back a 1kg bunch from a recent trip). When the oil was nice and hot, I added the cut-up stems, salt and pepper, and sauteed them for a few minutes. I then added the leaves, torn in smaller pieces, and left all that to cook over medium heat, for a few more minutes.
Meanwhile, I made a cup of tea and let a handful of raisins soak in it, toasted a handful of pinenuts in a dry skillet and put the oven on to preheat at 220°C.
When the chard was ready, I drained it in a colander, then put it in a medium bowl, adding in half a cup of ricotta, the drained raisins and the pine nuts. This was poured into the prepared pie pan, and the edges of the dough were folded back to cover some of the filling. Ideally, the crust should be brushed with a beaten egg yolk or melted butter, but I skipped this part.
I put the pie in to bake for about 35 minutes, until the crust was nice and golden. At that point I realized that the filling was still a bit too wet. I should have drained the chard more thoroughly. But it seemed ready otherwise, so I took it out and sort of mopped the extra liquid with a paper towel, then left it on the counter for a few minutes before serving.
I like this recipe very much. The sweetness of the raisins and ricotta balanced the otherwise sharp taste of the chard, and the pinenuts offered a nice textural change. The amount of filling made for a very satisfyingly thick pie, and the pizza dough was nice and crunchy, but thin enough not to occupy the center of the stage. Leftovers reheated very well in the oven the next day…