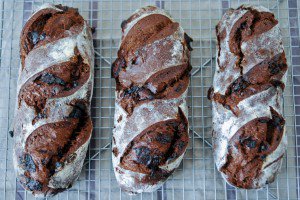
Pain au levain naturel
If you keep an eye on my Twitter feed or subscribe to the C&Z newsletter, you already know that I’ve been trying my hand at natural starter bread for the past two months.
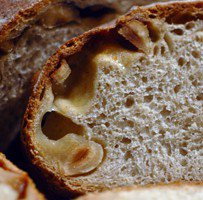
A natural starter, also called a sourdough starter, is a culture of wild yeasts and friendly bacteria that the baker keeps alive and thriving by feeding it water and flour on a regular basis. When mixed with a larger quantity of water, flour, and salt, and left to ferment, these microorganisms act as a leavening agent that will make the dough rise to form an extraordinarily flavorful loaf, one with mildly acidic notes, but not as sour as the typical San Francisco sourdough — unless that’s what you’re shooting for.
The beauty of such starter breads is that their flavor is complex and unique.
The beauty of such starter breads is that their flavor is complex and unique (because they rely on yeasts and bacteria that are naturally present in grains, no two starters are alike, especially from one region of the world to another), they keep very well (“the [friendly] bacteria somehow delay starch retrogradation and staling, and the acids they produce make the bread resistant to spoilage microbes”*), they are more nutritious than breads leavened with commercial yeast (the long fermentation induced by the starter is said to make the nutrients in whole grain flours considerably easier to absorb, as well as lower the glycemic index of the bread), and they’re as close as one can get to the essence of bread: a mixture of flour, water, and salt that does not rely on a store-bought leavener.
I had long been drawn to this bread-baking approach, but had always shied away from it because it seemed work-intensive and forbidding, and I had trouble relating to the people who wrote about it: the discussions were usually so advanced as to be overwhelming for a beginner. And then one day, I stumbled upon Florence’s blog by way of Clea’s, and I recognized a kindred baker spirit: Florence wrote about the process in clear terms, technical enough that I could grasp the underlying science, but practical enough that I could see it happening in my own kitchen. I was excited, and ready to take on the challenge.
The one thing that’s needed before boarding the natural starter bread train is, you’ve guessed it, a starter. You can build your own from scratch, following a five-day process that is an adventure in and of itself, but is well documented on many sites, such as here, here, or here. The specifics may differ, but the idea is always the same: you need to create a water/flour environment that encourages the yeast spores in the grain to settle in it and start a colony. The good news is that the summertime (or late spring to early fall) is the best time to start: the higher temperatures foster the development of micro-organisms, so starter builders report their best successes then.
The other, easier option is to obtain some from another baker: because the yeast and bacteria multiply constantly in a well-maintained starter, it’s easy and harmless to remove a portion and pass it on to someone else. What’s more, the recipient benefits from the complexity of an older starter, which has gathered a more varied assortment of microorganisms over time.
Because bakers develop a fond to obsessive relationship to their starter, it is traditional to give it a name, and I’ve decided to name mine Philémon.
As it happens, I was able to purchase a little pouch of starter from one of the organic baker stands at the greenmarket I go to**, saving time and gaining flavor for a mere 1€. (You may think this baker would be shooting himself in the foot — or perhaps killing the goose that laid the golden eggs — by selling his starter so people could bake their own bread, but the truth is I didn’t really buy his bread before, and now I buy organic flour weekly from him to bake my bread, so he’s really gained a customer instead.)
And so, for the past two months, I’ve been feeding my starter daily and getting to know it: what it likes, how much it needs, and when it needs it. Because bakers develop a fond to obsessive relationship to their starter, it is traditional to give it a name, and I’ve decided to name mine Philémon, after one of my favorite bande dessinée characters*** from childhood.
The daily feeding may seem like a big time commitment, but it really takes two minutes. All in all, it is no more work than taking care of a goldfish, except there is no tank to clean (eww!) and my goldfish never rewarded me with the song of freshly baked bread (perhaps I didn’t pick the right breed).
I have been baking a weekly loaf of pain au levain with Philémon’s help, and the results are both wowing and steadily improving: every time I pull one from the oven, I have to set it down quickly so I can clap my mitted hands and squeal with glee. It is the most gratifying thing I know, to explore an entirely new subject and feel one’s skills develop and strengthen with each new attempt.
So far, I have been building on Florence’s basic recipe for what she calls (with good reason) the simplest starter bread in the world, and from which the recipe below is adapted. I love it because it relies on an easy 1.2.3 ratio: 1 part starter****, 2 parts water, 3 parts flour (in weight), plus 1.8 to 2% of the flour weight in salt. (Speaking of ratios, you have read Michael Ruhlman’s empowering book on the subject, right?)
There is much to learn, but the journey is fascinating, and boy, is there good bread on board.
But there are myriads more recipes, methods, tricks, and techniques I have to experiment with. There is much to learn, but the journey is fascinating, and boy, is there good bread on board. I have to warn you, though: baking with a natural starter is an endless area of study, and once you’re hooked, entire afternoons can pass by in a heartbeat, so engrossed you are in the many blogs and forums dedicated to the subject.
So, without further ado, I give you my starter bread routine, outlined below — this is definitely not the only way to go about it, but it is what has worked for me so far. I have tried to describe it in some detail, but I do hope I’m not making it seem more complicated than it is. If it seems puzzling at first, I encourage you to read a lot from different sources, and you’ll soon familiarize yourself with the terms and techniques, until you feel ready to jump in. After baking a few loaves, you’ll also develop a sense of what the starter and dough should be like at every step, allowing you to bake by feel, tweak, and experiment; and that’s when the fun begins.
~~~
* Page 544 of Harold McGee’s On Food and Cooking.
** I am referring to the marché des Batignolles, which is held on Saturday mornings outside the Rome metro station in the 17th arrondissement of Paris. When you exit that metro station and reach the greenmarket, walk up the left alley: the baker is three stalls down on your right-hand side, just after the florist.
*** Philémon is the eponymous hero of a French graphic novel series created and drawn by Fred in the seventies and eighties. It tells the adventures of a teenager who goes back and forth between the world as we know it, and a fantasy world, poetic and surrealist, in which the letters that spell OCEAN ATLANTIQUE on the map are actual islands one can visit. See this site (in French) for a difficult-to-navigate but thorough look at the significance of Fred’s masterpiece.
**** This ratio applies to what is called a 100% starter, meaning it is always fed equal amounts (in weight) of flour and water. (The percentage refers to the hydration of the starter, so an 80% starter would be fed 80 grams of water for each 100 grams of flour.) The consistency of a 100% starter is similar to that of a pancake batter — thicker than a crepe batter, but thinner than most cake batters.
i. About my starter
ii. Refreshing the starter (daily)
iii. Preparing enough starter for a new loaf (baking day – 1)
iv. Baking bread
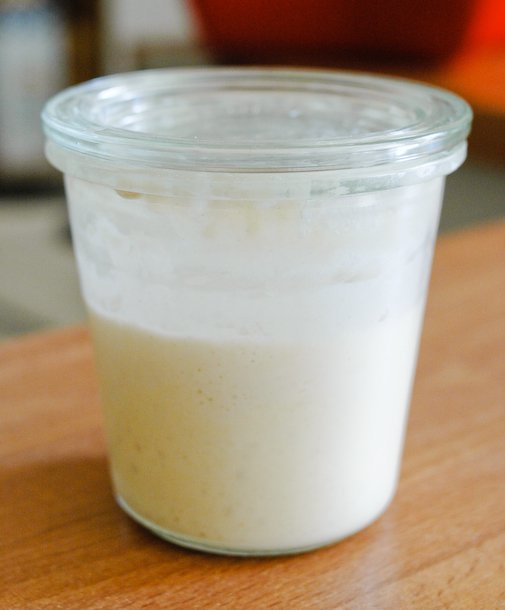
The chef starter is a portion of the starter that you always keep, and feed regularly so the yeast culture will continue to thrive.
I keep my chef starter on my countertop in a 250-ml (1-cup) Weck jar that would normally be shut with a rubber band and metal clips, but because the starter needs to breathe, I simply place the lid on top without fastening it. The sides of the jar get a bit crusty with flour after a while, so I transfer it to a fresh but identical jar every two weeks or so. (It’s important that the jar be super clean and free of any trace of soap.)
Even though I only bake weekly, I’ve been keeping my starter at room temperature and feeding it daily. Some bakers place it in the fridge from one week to the other, but so far I have avoided that because I’ve read this halts the lactic fermentation but not the acetic fermentation and produces more sour-tasting loaves, which I don’t care for. I have to experiment with that as well.

Have you tried this? Share your pics on Instagram!
Please tag your pictures with #cnzrecipes. I'll share my favorites!
Ingredients
- the jar of chef starter fed the day before
- 35 ml (2 tablespoons plus 1 teaspoon) water (from a water-filtering pitcher, or spring water)
- 35 grams (1 1/4 ounces, about 1/4 cup) all-purpose wheat flour (I use an organic T65 flour)
Instructions
- Using a wooden spoon that you'll preferably reserve for this purpose, stir the chef starter in the jar to smooth it out; its consistency will turn from mousse-like to pancake-batter-like.
- Spoon out all but 1 tablespoon of the starter. Throw the excess out or pour it into an airtight container that you'll keep in the fridge (I use a 2-cup tub of yogurt that I've cleaned and saved)*.
- Pour the filtered water into the jar of starter and stir it in. Add the flour and stir it in energetically until smooth (this also helps incorporate some air into the starter) -- I usually count to 30. Scrape down the sides of the jar with the spoon, put the lid on the jar, and place the jar on the counter.
- Rinse the wooden spoon; it's best not to use detergent on it, or some of it might end up in the starter.
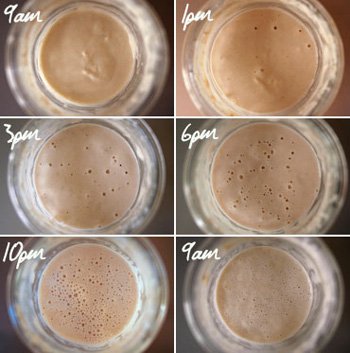
- If the starter is in good shape, it will bubble up and rise in the jar to double in volume after a few hours (how many hours depends on the vitality of the starter and the temperature), before settling and slowly sitting back down in the jar (see pictures below).
Notes
- Alternatively, if you prefer not to look after it daily, you can feed it a bit more generously, place the starter in the fridge an hour or two after feeding, and keep it in there for up to a week. Let it come back to room temperature (let it sit for about 2 hours on the counter) before feeding it again, or before using some to prepare enough starter for a new loaf (see below).
- The reason why so much of the starter must be removed is that the starter needs to be fed its own weight in flour and its own weight in water daily. If you keep all of the "old" starter every day, it will triple every day and build up to an exponentially large quantity: you will gradually need more and more flour to keep it happy, and this will be much more costly in the end. Some people just throw out that extra starter, but I prefer to keep it in the fridge and work it into my crêpe, cake, or clafoutis batters, in pizza doughs, etc. -- I will soon post a few ideas to use it up. This extra starter could also be given away to another baker.
Have you tried this? Share your pics on Instagram!
Please tag your pictures with #cnzrecipes. I'll share my favorites!
Ingredients
- 70 grams (2 1/2 ounces) of starter taken from the chef starter that was fed in the morning (stir starter well before scooping some out)
- 70 ml (6 tablespoons) water (from a water-filtering pitcher, or spring water)
- 70 grams (2 1/2 ounces, about 1/2 cup) all-purpose flour (I use an organic T65 flour)
Instructions
- Using a wooden spoon, scoop the 70 grams of starter from the jar into a clean bowl, about 500 ml or 2 cups in capacity. (This should leave you with about 1 tablespoon chef starter in the jar.) Pour the water into the bowl and stir it in. Add in the flour and stir it in energetically until smooth (this also helps incorporate some air into the starter). Scrape down the sides of the bowl with the spoon, cover the bowl with a small plate or lid, and place the bowl next to the chef starter so they can tell knock-knock jokes to one another all night.
- Rinse the wooden spoon (again, no detergent) and go to bed.
- In the morning, you'll feed the chef starter as usual, but you won't need to remove any because the extra starter has just been used.
Have you tried this? Share your pics on Instagram!
Please tag your pictures with #cnzrecipes. I'll share my favorites!
Ingredients
- 200 grams (7 ounces) of the starter (sponge) you've left to ferment in the bowl overnight
- 400 grams (14 ounces) water (again, from a water-filtering pitcher, or spring water)
- 600 grams (21 ounces) various flours (I generally use a mix of spelt flour, whole wheat flour and light whole wheat flour, with an occasional bit of rye, all of them organic), plus more for shaping and handling
- 1 tablespoon wheat gluten (optional, but good when working with French flours, which tend to be "soft", i.e. low in gluten; look for it at natural food stores)
- 10 grams (2 teaspoons) sea salt (I use an unrefined "grey" sea salt such as this one, only it's about eight times cheaper to buy it here)
Instructions
- Combine the starter, water, flour, and gluten if using in the bowl of a stand mixer fitted with the dough hook. Mix on lowest speed for a few seconds, just until combined, and let rest for 30 minutes (this step, called autolysis or autolyse, allows the flour to absorb more water and the gluten strands to shorten, making the dough easier to handle later).
- Add in the salt, and knead at moderate speed for 7 minutes (I use speed 1 or 2 of 10 on my KitchenAid), until the dough is smooth and shiny and pulls away from the sides of the bowl. It will still be tacky, because this is a dough with a rather high hydration. Note that different flours have different absorbencies, so you may have to play with the quantities of flour and water from one loaf to another until you determine how wet you want the dough to be.
- [You can also knead the dough by hand, but it will take longer and you may want to use a little less water -- say, 360 ml or 1 1/2 cups -- so the dough is less tacky.]
- Cover the bowl with a kitchen towel and place it in a temperate, draft-free spot.
- An hour or two later, when the dough has started to rise a little, use a flexible scraper to "fold" it over itself in the bowl, as demonstrated in this video (the dough will be less shaggy that this, but the gesture is the same). This folding step helps give structure to the dough and develops the flavor of the bread. Cover the bowl with the towel again.
- An hour or two later, if you can and if you don't forget, fold the dough again.
- Six to eight hours after the kneading -- the exact time will depend on the temperature, the vigor of your starter, and the mix of flours you've used --, when the dough has about doubled in volume, it is ready for baking. Another way of knowing is to poke it gently with your finger: if the indentation springs back, the dough needs more time; if it stays hollow, it's ready.
- [Alternatively, you can prepare the sponge in the morning and put together the dough in the evening. After the first folding, cover and let it ferment in the fridge it all night. In the morning, let it come back to room temperature for about 2 hours, then continue as written below. This will produce a slightly more tangy loaf.]
- Pull out an ovenproof cast-iron pot with a lid (make sure the handle of the lid can take a high temperature without melting) such as this one, or an ovenproof glass casserole such as this one; ideally, the vessel should be about 3 liters (3 quarts) in capacity (and not too much more, or the loaf will spread and won't rise as much). Pour a drop of neutral-flavored oil into the pot, add a good pinch of flour, mix with the tips of your fingers and rub this mixture along the bottom and sides of the pot. This will prevent the loaf from sticking to the pot. Set aside.
- Pour the dough out into a big blop on a generously floured surface (I use a generously floured silicone baking mat). It will be a rather shaggy dough. With well floured hands, lift one edge of the dough and fold it over toward the center. Repeat with the opposite side, so you'll be folding the dough in three like a business letter. Give the dough a quarter of a turn and fold it in three again. Handle the dough with determined gestures, but be gentle: you don't want it to deflate it too much and the surface shouldn't tear. The folding should have given it enough structure that you can pick it up; repeat the folding if that's not the case.
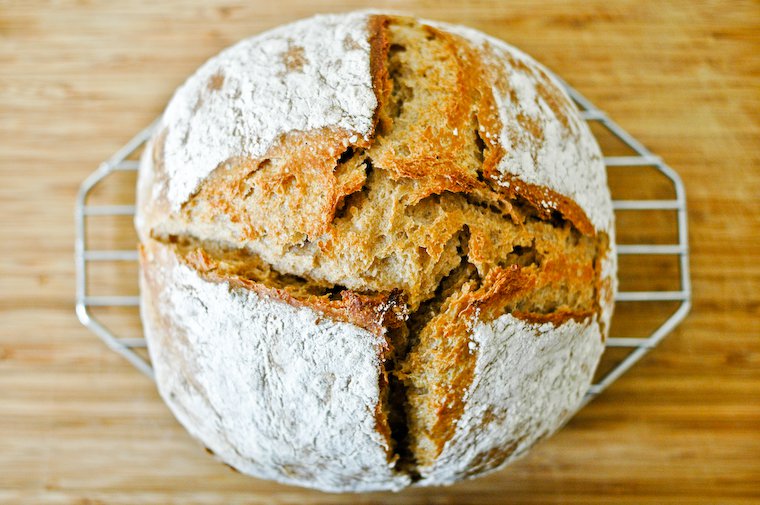
- Lift the dough delicately with both hands, and flip it upside down as you lower it into the prepared pot; the seam should face down. Using a very sharp thin knife or a razor blade with a handle (such as this incisette), score the top of the bread to form a cross, or the shape of your choice. (See this helpful bread-scoring tutorial for tips.)
- Place the lid on the pot and the pot in the cold (not preheated) oven. Switch the oven on with a temperature setting of 240°C (460°F) and leave the bread in for 1 hour (starting from the moment you insert the pot; my oven takes 15 minutes to reach 240°C), until well risen and golden brown.
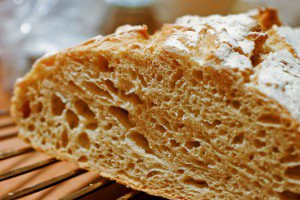
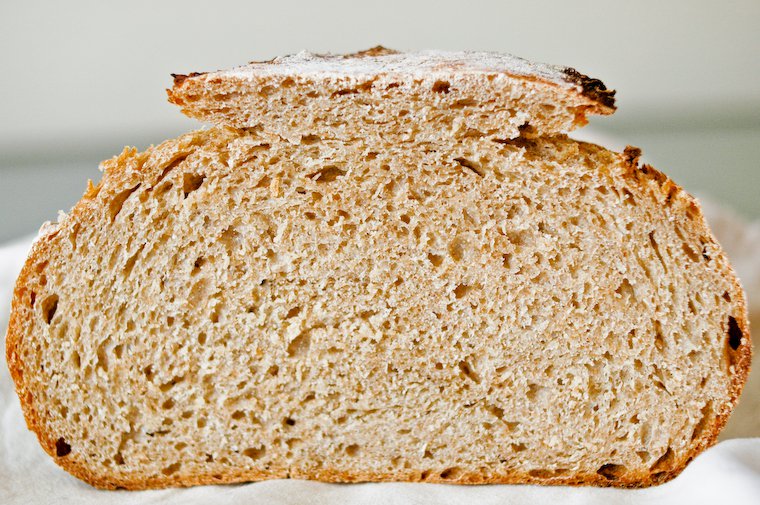
- Remove the pot from the oven, transfer the loaf onto a rack, and check that it sounds hollow when tapped on the bottom (obviously, the bread will be piping hot, so be careful). If it doesn't, return it to bake a little longer. If it does, let cool completely before slicing (I insist: if you slice it prematurely, the crumb will be gummy). The loaf will keep for about a week if well wrapped, or you can freeze half and take it out later in the week.