There’s nothing like an edible host(ess) gift, and I have found that bringing a loaf of freshly home-baked bread makes you a very popular guest indeed.
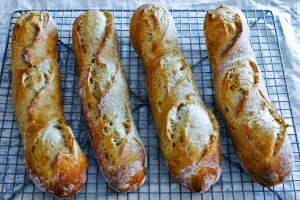
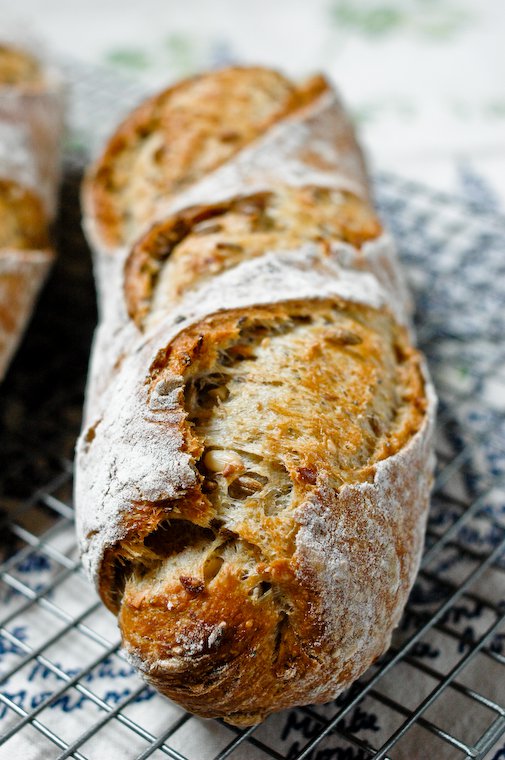
What I like to do then is schedule my weekly bread baking on the day that we’re expected at a friend’s house, and make bâtards, those plump, elongated loaves: I’ll bake three at a time, save two for our own consumption, and bring the third one — the one with the best looks, I am shallow that way — along to dinner with us.
In my next life, if I come back as a super organized and freakishly foresighted person, I’ll keep a stash of pretty tea towels in which to swaddle the loaf, and the whole thing will be my gift. Until then, I will continue to just wrap it in one of my more presentable torchons, and say “oh, great, thanks!” when the host or hostess returns it to me.
In my next life, if I come back as a super organized and freakishly foresighted person, I’ll keep a stash of pretty tea towels in which to swaddle the loaf, and the whole thing can be my gift.
Of course I let them decide whether they want to serve that bread with dinner, but my secret preference is that they save it for their own breakfast the next day. (I also tell them that it freezes well.)
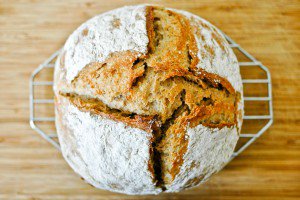
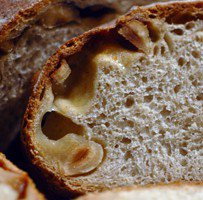
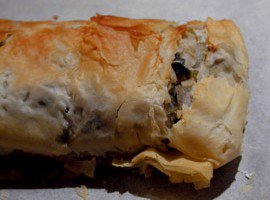
The recipe I’ve most often used for bread gifts lately is this one, which produces appetizing and wonderfully flavorful loaves freckled throughout with a generous helping of grains and seeds.
It is based on a recipe by Steve B., whose blog Bread Cetera is a valuable resource for those of us who wish to expand our bread-baking horizon and develop a better understanding of the craft.
I follow the basic formula Steve offers for the dough*, which has you soak the seeds and grains overnight before using, and then apply the method I use to make sourdough baguettes: I mix the dough on the eve of the bake, let it ferment in the fridge overnight, then simply shape and bake the loaves the next day.
Join the conversation!
Do you ever bring bread as a host(ess) gift? If so, what kind?
* With slight modifications: I don’t add the small amount of commercial yeast, I adjusted the quantities of starter to list only what’s used in the dough, and two-thirded all the amounts. I invite you to read Steve’s post and the ensuing discussion.

Have you tried this? Share your pics on Instagram!
Please tag your pictures with #cnzrecipes. I'll share my favorites!
For step-by-step pictures of a similar process, please refer to my post on sourdough baguettes.
Ingredients
- 90 grams (3.2 ounces) mixed seeds (my mix includes sesame, poppy, sunflower and flax seeds)
- 50 grams (1.8 ounces) rye berries
- 40 grams (1.4 ounces) oat groats
- 200 grams (7 ounces) boiling filtered water
- 250 grams (8.8 ounces) ripe 100%-hydration sourdough starter*
- 600 grams (21 ounces) mixed flours of your choice (I use partially whole wheat and spelt flours)
- 2 tablespoons wheat gluten (optional, only if you use flours that are low in gluten, as French flours tend to be)
- 300 grams (10.5 ounces) filtered water
- 15 grams (1 tablespoon) sea salt
Instructions
- The night before, prepare the soaker: combine the seeds, rye and oats in a heatproof bowl and add the boiling water. Cover and set aside.
- The next day, place the starter, flour, gluten if using, and filtered water in a large mixing bowl, or in the bowl of your stand mixer. Stir until the mixture forms a shaggy mass and let rest for 30 minutes to 1 hour (this is the autolyse phase: it allows the flour to absorb the water before the salt has a chance to draw it away).
- Add the salt and knead with the dough hook on low speed (or by hand) for 2 minutes, until the dough becomes smooth. Add the soaker (seeds, grains and water), and knead on low speed for 6 minutes, until the seeds are incorporated -- you may need to stop the mixer from time to time and fold the dough over the soaker to help the process -- and the dough forms a smooth ball that no longer sticks to the sides of the bowl. (Of course, the kneading can also be done by hand, on the counter, though beware that it's a rather sticky dough.)
- Cover with a kitchen towel and let the dough rest at room temperature for 1 hour. After an hour, fold the dough over itself (as demonstrated in this video) about a dozen times -- this helps give oxygen to the yeasts in the dough, it develops the flavors and builds a well-structured crumb -- and cover with the kitchen towel again.
- Let rest for 1 hour and fold again as above.
- Apply a piece of plastic wrap directly on top of the dough, and a shower cap around the rim of the bowl. Push the shower cap down until it touches the plastic wrap -- you want the cover to be somewhat airtight -- and place the bowl in the fridge for 12 to 24 hours. (Note: when I'm all done baking, I let the plastic wrap dry so I can shake off the little flakes of dough, and save the plastic wrap and the shower cap for use with my next loaf.)
- Remove the bowl from the fridge; the dough should have about doubled in size.
- Remove the plastic wrap and replace it with the kitchen towel. Let the dough come back to room temperature, about 1 hour.
- Place a square or rectangular baking stone on the middle rack of your oven and preheat it to 300°C (570°F) or whatever the highest temperature setting is on your oven, for 30 minutes. If you don't have a baking stone, preheat the oven to 240°C (460°C) and line a cookie sheet with parchment paper.
- Have ready a well floured linen kitchen towel that you will reserve for this use (no need to wash it after baking; the more you flour and use it, the less it will stick).
- Turn the dough out onto a well floured surface (I dust an old silicone baking mat heavily with flour). Divide it into three pieces of equal size: each should weigh about 510 grams (18 ounces).
- Shape each piece into a bâtard, as demonstrated under the name "ovals" in this video.
- After shaping each, place it on the floured kitchen towel and pull the cloth up on each side to form a ridge that will support its shape. Cover with a kitchen towel and allow to rest for the remainder of the preheating.
- During the last 5 minutes of preheating, insert a rimmed baking sheet in the lowest rack of the oven, underneath the pizza stone. Bring about 360 ml (1 1/2 cups) water to the boil in the kettle.
- Just before you're ready to insert the baguettes in the oven, make sure you wear something with long sleeves and put on an oven mitt. Using a vessel with a pouring spout (such as a measuring jug), pour half of the boiling water into the rimmed baking sheet -- it will sizzle and steam and it will be a bit scary -- then close the oven door right away.
- This is to create a nice, steamy environment, to foster the formation of a nice crust. Be careful not to burn yourself as you do this -- that is what the long sleeve and oven mitt are for -- and keep kids and pets out of the kitchen for this step.
- If you're using a baking stone, place the bâtards on a well-floured pizza peel. Slash each of them 3 times with a baker's blade or a sharp knife, working the blade at a 45° angle. Slide them onto the pizza stone, working quickly to prevent the heat and steam from escaping.
- Pour the remaining water into the rimmed baking sheet, and lower the temperature to 240°C (460°F).
- If you don't have a baking stone, arrange the bâtards on the prepared cookie sheet. Slash them as directed and insert into the middle rack of the oven. Pour the remaining water into the rimmed baking sheet, but don't change the temperature.
- Bake for 15 minutes, then lower the temperature to 210°C (410°F) and bake for another 25 minutes, until the loaves are golden brown and sound hollow when tapped at the bottom. If the color is good but they sound like they could use a little more baking, turn off the oven and leave them in for another 5 to 10 minutes.
- Transfer to a rack to cool completely before eating or wrapping up.
Notes
A "100%" starter is fed an equal weight of flour and water at every feeding. To learn more about starters, please refer to my post on natural starter bread.